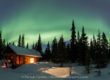
Based on my last post and some interest in the process of applying split grads in LR3, I decided to show a simple illustration of that process with this landscape photo that I took in Polychrome Pass, late one night in August.
A video might be better to explain all this, but there is some advantage to seeing all the pictures as well.

To exposures about two stops apart. One exposed for the foreground, one exposed for the sky
The above illustration shows two different exposures of the same scene. They are approximately two stops apart. One is exposed for the foreground and one for the sky. Both are a little extreme, so I used an exposure in the middle, exposed to the right for shadow potential maximized, see below.

Exposed to the right just with a slight highlight warning in the sky.
I chose to use this image, with just a slight highlight blink which is recoverable through exposure and recover sliders in LR3. The anticipated post production application is two split grads, one for the sky and one for the foreground. See this development below.

Slight exposure correction and application of split grad for sky
To start with I made a slight decrease in overall exposure and applied a split grad filter with the brightness reduced to about -50

Application of split grad for the foreground
I then added another split grad in reverse proportion for the foreground (note the little dots that show the angle of the split grad. The black dot means that grad is active and the space between the two lines is the region of the gradation. The longer the space, the softer the gradation.)

Final tweaks of contrast, vibrance, clarity, etc., along with a few dust stamps.
After that, I applied a few other changes: contrast +8, vibrance +10, clarity +15, along with some overall recovery, fill and exposure/brightness tweak. Then the camera lens profile correction was added along with a few dust spots stamped out. And there you have the finished product.

Polychrome pass, Denali National Park, Alaska. Canon 5D Mark III, 16-35mm f/2.8L, 0.4 sec @ f/16, ISO 100

Final extra tweaked version
And if you really want to art out the scene, you could go a few steps further. This is all a matter of preference and I prefer to stay more true to the scene, but by adding two more split grads in variation to the sky, warming the color temperature a bit, and adding a little more vibrance and saturation to the warm colors, you end up with this.


Great! Fabulous demonstration Patrick, thank you! It is the finishing touches that make the images as nearly as spectacular as our eye sees these views, but not as breathtaking as in person. Thanks for the tour behind the curtain, Wizard Patrick.
Thanks for all the great shots and inspiration you provide. I just made a trip to Denali in July and realize after leaving that there is so much to capture and so little time to do it. What you are giving us all to see shows a lot of depth to what is there. I wish I could spend so much more time there. Just keep sharing!
Walt Cornelison
Nedretlaw Photography
Walt, thanks for your comments. Denali seems endless with vistas and opportunities for photography. I hope you have another chance to visit.
Vibrance and clarity, hmmm. Two setting that I’ve been too intimidated to slide. Maybe its time to push the envelope a little more…
Steve,
Both of those are generally used with restraint. I rarely use saturation any more.
Thanks for the tip, Patrick. I have used the split grad in Adobe Camera Raw but never thought about adding 2 to the same image, and in paticular, for improving contrast in the foreground. Great work.
Also, neat sighting and photo of the sharptail. These are fascinating birds to watch on a lek in the spring. One of nature’s truly great shows.
Milo,
Thanks, I go pretty crazy with split grad in LR3, often using 3 to 5 in various configurations. There is so much more control it makes processing images a delight–sort of 🙂
I hope to photograph the grouse on a lek next year. There is one near my friends house, as I’ve not found one near me. Have you photographed them in such a situation before?
In both Montana and Wyoming I have set up blinds for both sharptails and sage grouse. They were some of my most memorable times behind a camera. The grouse readily habituate to a blind. It was important to get in the blind before daylight (perhaps not an easy task in Alaska spring?). Once habituated to the blind and the sound of the shutter, you could basically reach out of the blind and grab one. The display dance is incredible to watch. Best of luck with it.
Thanks Milo,
I’ll let you know if I pull this off next spring.
Patrick
Dear Patrick: I returned from my first ever trip to Katmai and Denali. I thought some of my shots were good, but, after seeing yours, I’m a rank amateur.
Hopefully, you will answer a question…using my Nikon D50 w/5-200 zoom, I often a “hazy” effect even when the naked eye shows no haze at all. This especially happens when I’m shooting far off mountain scenes. Any suggestions?
Thanks for your wonderful photos and for your blog. You have a real gift.
Best, Pat
Patrick,
Thanks for your comments. Regarding your specific question, it is hard to address without actually seeing the file. Shooting great distances does increase the hazy effect caused by atmospheric “stuff”. Sometimes, increasing contrast in LR can reduce that hazy look. Also, depending on the lens, if you are shooting into a bright light source, that can cause a little bit of overall haze-like flare. The lens you noted is not a pro lens, but still should be able to resolve a photo indicative of what your eyes saw.