Tips: How to photograph the aurora borealis
By Photographer Patrick J. Endres
Updated 12/20/2024
Updated 12/20/2024
I’ve taught photographers how to photograph the aurora borealis (northern lights) for decades. While digital cameras offer real-time feedback in the field it has not removed the need for experience or being well-informed about the many factors necessary to make aurora photography a success.
Below are excerpts from a tutorial ebook I wrote on “How to Photograph the Northern Lights, which is now in its 3rd edition. I teamed up with the former University of Alaska aurora scientist Neal Brown, who offers scientific explanations about the aurora.
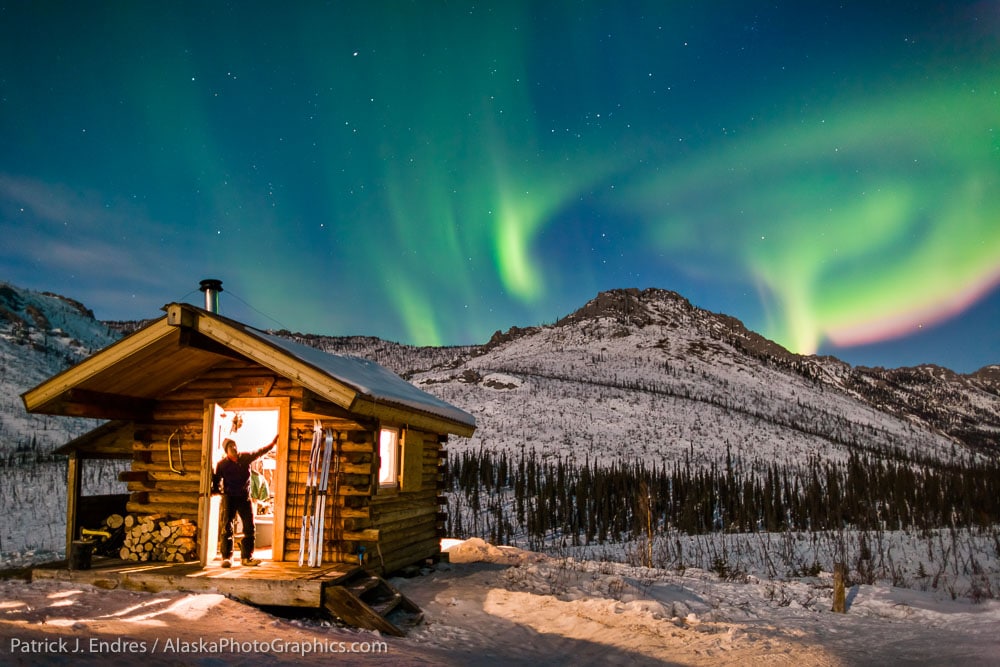
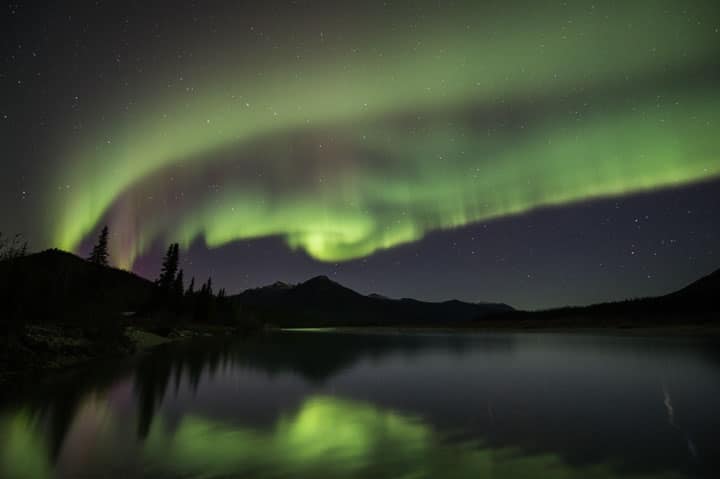
A self-portrait I took years ago while on a photo excursion to the Caribou Bluff recreation cabin in the White Mountains National Recreation Area, Alaska.
Aurora Science and Forecasts
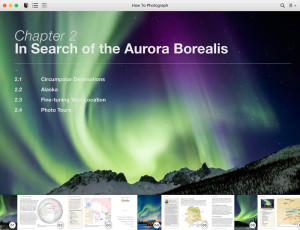
In Search of the Aurora
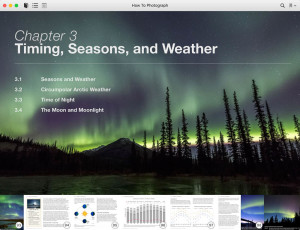
Timing Seasons and Weather
Dealing with the Cold
Aurora Exposure
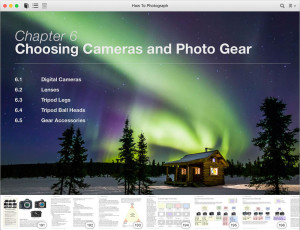
Choosing Cameras and Photo Gear
Preparing Your Camera
In the Field
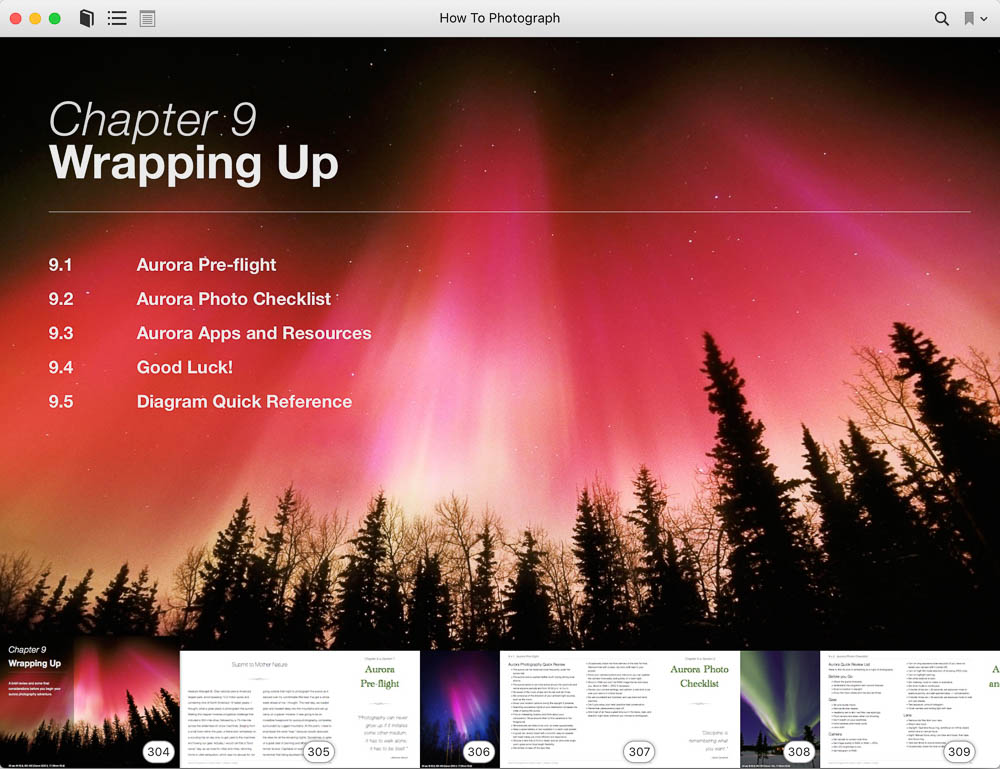
Wrapping it Up
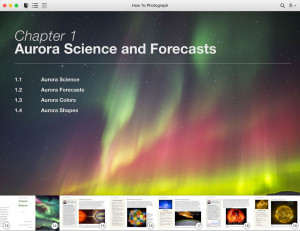
Screenshot from my eBook. Aurora science and forecasts.
It was only 100 years ago that scientists discovered that the sun was responsible for the northern lights. Since then, we have come a long way in understanding space science. The National Aeronautics and Space Administration (NASA) Heliophysics Research Division has made significant efforts better to understand the sun and its effects on Earth. Scientists have collaborated to monitor how, why, and when solar storms happen, and we aurora photographers benefit from the knowledge they share.

The aurora are caused by solar storms that throw vast numbers of fast-moving electrons and protons away from the sun in a twisting mass of electric and magnetic fields. These microscopic particles typically take two days to travel 150 million kilometers from the sun to Earth.
These energetic electrons and protons initially move past Earth for several thousands of miles before traveling back along Earth’s magnetic field lines into Earth’s atmosphere. Then, through a process similar to a neon sign, they collide with the atoms and molecules of Earth’s atmosphere to create the light we call the aurora. Not all solar storms produce aurora. Only if the solar storm’s magnetic field couples with Earth’s magnetic field do we have a chance to see auroras.
Even the smartest aurora scientists will tell you that predicting the aurora’s presence on any given night is far from a perfect science and includes many changing variables. Many resources that help give some idea of northern lights activity exist on the Web. Here are two worth noting:

The band represents the AK’s range and extent of aurora borealis visibility. The graph is not a current prediction; click to check the current status.
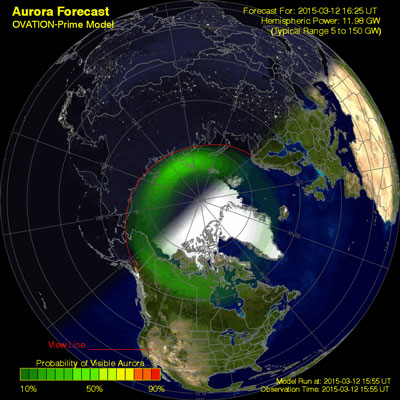
POES website: Aurora activity approximated in color bar representation. This image is updated every 10 minutes. See the date stamp in the graphic.
The solar storms that create the aurora often last several Earth months, with the aurora recurring every 27 days. The 27-day solar cycle is because the sun turns on its axis once every 24 Earth days. For example, a spot on the sun’s face rotates once every 24 Earth days until it again faces Sirius, the dog star. But Earth orbits the sun once every 365 days. So in 24 Earth days, Earth will have moved its orbit such that the sun needs to rotate the equivalent of 3 more Earth days for the stormy spot on the sun to again line up with Earth. Why the aurora recurs on a 27-day schedule was a mystery until astronauts obtained images of the solar storms in ultraviolet light that is absorbed by Earth’s lower atmosphere. Today, satellites regularly provide ultraviolet images of solar storms.
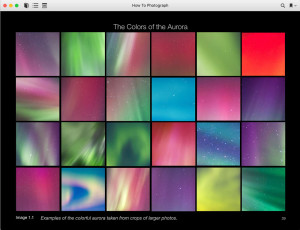
A sampling of aurora colors from some of the photos I’ve taken.
The atmospheric gas determines the color at altitude (mainly atomic oxygen and nitrogen), its electrical state, and the energy of the particle that hits the gas. The colors of the aurora are made up of red, blue, and green light emissions. Other colors may be seen as a mixture or blending of the three.
When evaluating an aurora picture on my camera’s LCD, I’m often shocked by the colors I see that are not visible to my naked eye. The camera captures a much more vibrant color when you can only see the faintest bit of color with the human eye. I’ve learned to shoot test shots often; you may be surprised by the colors your camera captures.
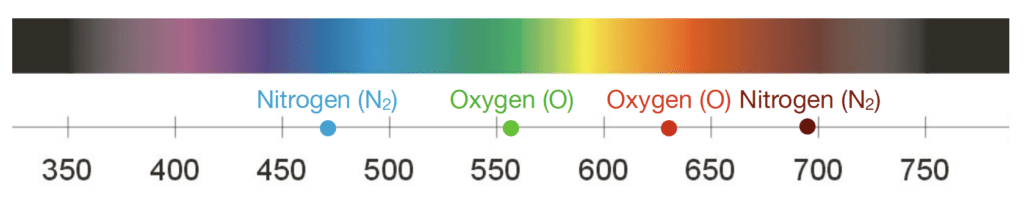
Color wavelength chart in nanometers. Some aurora colors, such as the deep reds, occur on the very outer edges of the color spectrum and are difficult for the human eye to see. Cameras can capture those colors much better, so your pictures reveal colors you can’t see with your naked eye.
The colors of the aurora change depending on which sun storm electrons and protons collide with which atoms and molecules in Earth’s atmosphere. The green light and the deep, broad red color that often occur high in Aurora appear when electrons collide with atomic oxygen atoms. The bluish-tinged vertical rays in the aurora appear when electrons impact singly ionized nitrogen molecules. The brighter lower borders of some aurora appear when electrons affect nitrogen and oxygen molecules and may briefly appear magenta. Faint broadband of blue that runs from magnetic east to west and just south of the greenish aurora appears when protons impact hydrogen atoms in Earth’s high upper atmosphere.
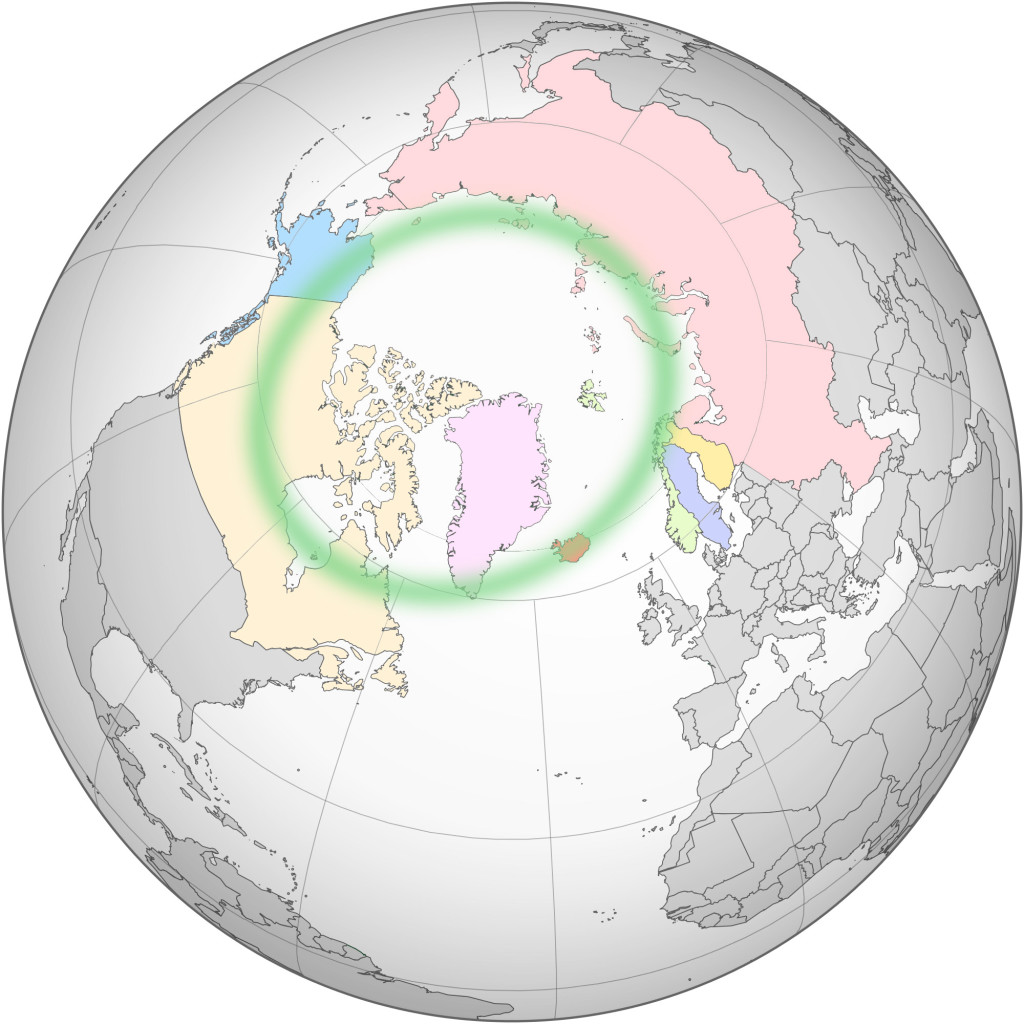
The auroral belt encircles the geomagnetic north pole, and in this zone, the aurora can be seen approximately 250 nights a year.
Because the aurora are drawn to the earth’s northern and southern magnetic poles, latitudes closer to the poles offer excellent opportunities for viewing auroral displays. The “auroral zone” (also called “belt” or “oval” is the region in the circumpolar north where the aurora borealis can be seen approximately two-thirds of the year. This region reaches all eight circumpolar countries. While the chances of seeing the aurora are statistically much more significant in the aurora belt region, it is unnecessary to travel there to see them.
During large geomagnetic storms, the aurora oval expands, and the northern lights can be seen in more southerly latitudes. However, this may happen on a much more limited frequency. In the U.S., Alaska is the only state under the aurora belt. Because the aurora is drawn to the earth’s magnetic poles, far northern and southern latitudes offer excellent opportunities for viewing auroral displays.
Chapter discusses the various locations for watching and photographing the aurora.
Some points to consider when selecting a location for aurora photography:
Geographic Latitude: It would be ideal, although not necessary, to find a spot within the auroral belt. (According to Dr. Syun-Ichi Akasofu, this is the polar region where the aurora is visible about two-thirds of the year). I live in Fairbanks, about 65 degrees latitude, which is geographically well situated for aurora viewing.
Light Pollution Free: Go somewhere free of light pollution, far from city lights or airports.
Direction/Orientation: Most of the shooting orientation will be between the northwest and southeast sky. With this in mind, position yourself to shoot with light sources (towns or cities) to your south. When extreme solar storms hit the earth’s atmosphere with strength, the northern and southern sky will contain the aurora, often in some wild colors.
In the United States, Alaska is the clear winner as an aurora borealis photography destination because of its proximity to the aurora belt. Additionally, the mountain landscapes of northern and interior Alaska make outstanding foregrounds for diverse and compelling photo compositions. In Alaska, the “auroral belt” or “zone” occurs between a 3° to 6° latitudinal range, near 70° N. I live in Fairbanks, Alaska, situated at latitude 64.8° N, just below the auroral belt, and offers excellent aurora viewing and photography opportunities.

Fairbanks, Alaska, is located between two mountain ranges, with a dry, cold climate and frequent clear skies.
I live in Fairbanks, Alaska, situated at latitude 64.8° N, just below the auroral belt, and offers excellent aurora viewing opportunities. Fairbanks International Airport provides relatively easy access to perhaps the best launching place for aurora photography in the United States. Whatever you decide to do, flying into the Fairbanks International Airport is a good start. There are vehicle rental companies and many hotels or B&B accommodations to choose from should you make Fairbanks your base to explore independently. Traveling the paved and relatively well-maintained roads that lead out of town within a 60-mile radius allows you to find plenty of locations suitable for aurora photography.
Fairbanks, Alaska, offers unique advantages for those who want to see and photograph the Northern Lights. The great east–west stretch of the Brooks Range to Fairbanks’ north and the Alaska Range to the south block movements of moist air and clouds. This gives Interior Alaska (and Fairbanks in particular) a dry continental, cold climate, and frequently clear skies. The crown of light, the typical oval of Aurora, hovers around Earth’s magnetic poles and varies in its southern reach depending on the strength of solar storms. Most nights, this puts the northern aurora oval right over the top of the south part of the Brooks Range of Alaska, near Fort Yukon. Auroras line up on Earth’s magnetic latitudes and longitudes, so when looking for auroras, it’s more important where you are in relation to the magnetic north pole than the geographic north pole.
Chena Hot Springs Resort, located along the Chena Hot Springs Road just 65 miles east of Fairbanks, takes guests on night excursions to see and photograph the aurora. You can combine a few nights at the resort with exploring the broader Fairbanks vicinity. One-night guided excursions in the Fairbanks area are also available, and companies providing this service are increasing.
If you do plan to explore on your own, practice attentive driving. Photographers are known for looking at the landscape instead of the road. This can be precarious, especially at night. While road surfaces are generally in good shape, icy conditions in Alaska’s Interior are common in the winter. Exploring the areas ahead of time, during the daylight, is safer. Stop and pull off the road to check out the night sky, and don’t drive sleep-deprived.
Driving north of Fairbanks on the Dalton Highway in winter can be very treacherous, and it is not recommended unless you are a veteran winter driver. Your vehicle should have the necessary safety equipment, including a CB radio, road flares, spare tires, cold weather gear, emergency gear, jumper cables, tow rope, etc.
How critical is the timing?
March is the most geomagnetically active month of the year; October is a close second.
Aurora activity is directly connected with solar storm activity on the sun’s surface. Therefore, awareness of this will help determine the optimal times for viewing the most active aurora displays.
According to SpaceWeather.com, statistically speaking, March is the most geomagnetically active month of the year; October is a close second. Although the reasons are not fully understood, there is no doubt that equinoxes favor auroras. The percentages are not hugely different than other months.
The data from their website plots geomagnetic activity per month overlaid with the cloudiness factor in the diagram below from my eBook. Remember, however, that clear skies can be equally, if not more, productive from a statistical perspective.
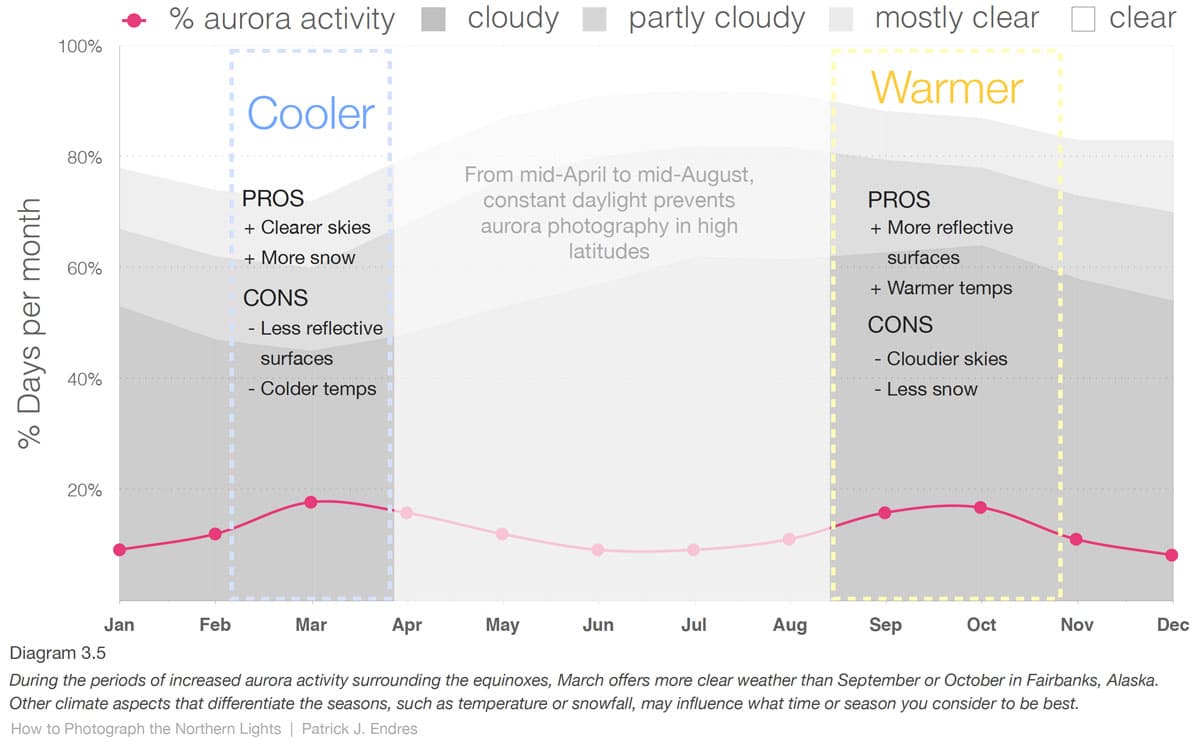
Diagram from How to Photograph the Northern Lights eBook.
I’ve photographed the aurora during all phases of the moon’s presence.
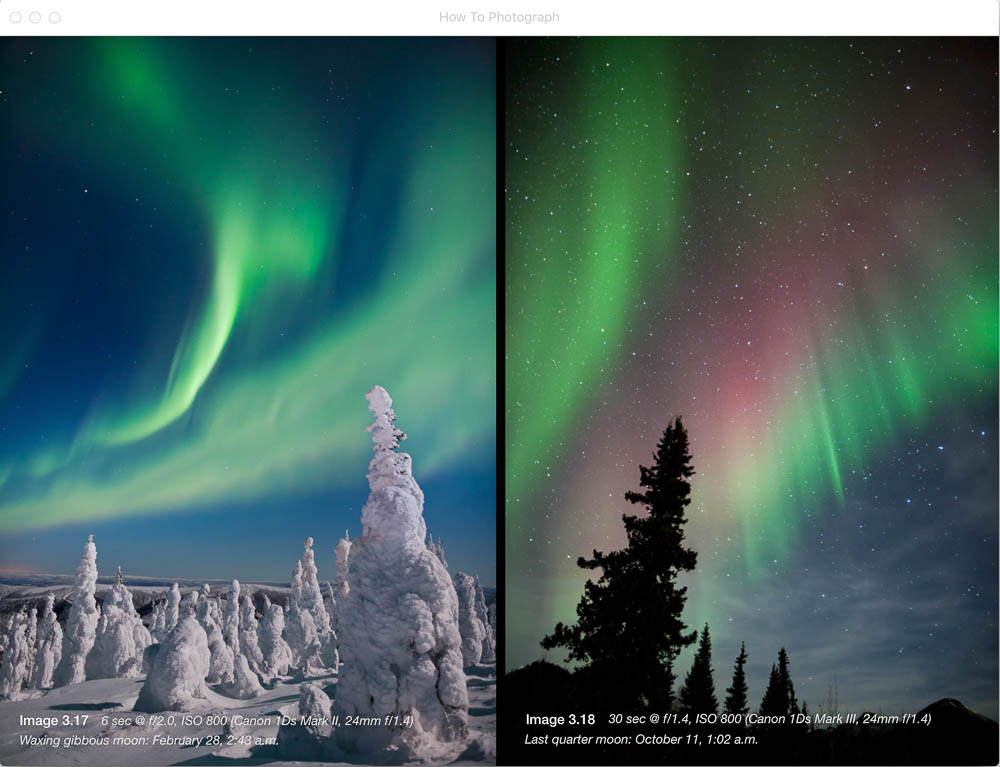
Two photos show the difference between the presence of a moon and the absence of a moon.
Predicting the best time of night to view the aurora is difficult. There are, however, some generalizations and statistical averages:
Stay awake and be ready. I’ve never had much luck going to sleep and waking periodically to check. The show can easily be over when you get dressed and prepare all the camera gear.
Plan to spend a chunk of time viewing. The aurora displays and activity follow a somewhat predictable pattern. Whether it is a homogenous arc, a rayed arc, or a corona, they present different photo opportunities at other times of the night.
Sunlight causes the sky to glow in ultraviolet light on the side of Earth next to the sun. The aurora causes the auroral crown of light over the northern hemisphere, which is the brightest in the midnight sector on Earth, away from the sun.
However, the brightest aurora is visible not at midnight by the clock but at magnetic midnight. That is when the magnetic pole of Earth, which is offset 11 degrees from the geographic pole, or Earth’s spin axis, is opposite the high-noon sun on the other side of Earth.
As Earth spins on its axis, during the half-hour before and after magnetic midnight, there is an arc of proton and light electron emissions that cause the aurora to go crazy and “break up” in bright, fast motions.
The chapter addresses how to deal with the cold, including recommendations for clothing and gear.
Because aurora viewing is best in Polar Regions, you will likely experience cold weather. Sometimes, frigid weather, especially if you are visiting Alaska in the winter. If cold weather freaks you out, consider late September or early April. The temperatures are slightly warmer then, but the skies are still dark at night.
Get yourself dressed properly and outfitted with the necessary equipment. This will greatly increase both your efficiency and enjoyment while spending a night photographing the aurora. Below are a few suggestions to help prepare you:

This happens to a usually flexible shutter release cord at minus 40 degrees below zero. © Hugh Rose
How to exposure properly.
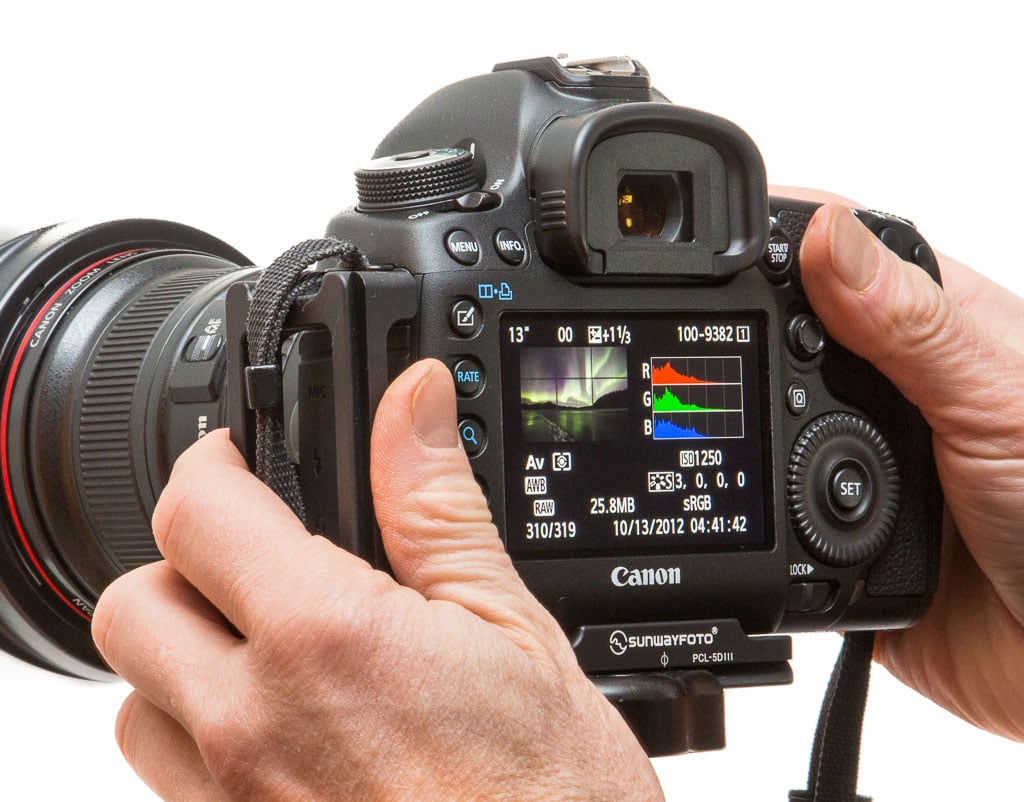
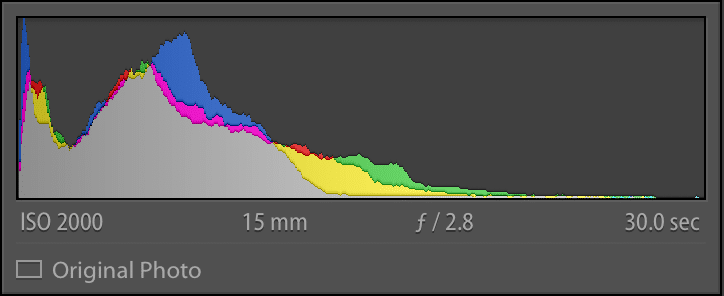
While the digital age has taken much of the exposure mystery out of aurora photography, it is imperative to be well-informed on a few particular aspects of digital photography to secure proper exposure. The histogram is perhaps the most helpful tool on your digital camera for getting adequate exposure. It is the graphical representation of the tonal values in your image. Camera LCD monitors can be deceiving during the dark, which is another reason your judgments on exposure should be based on your histogram and not the preview image you see. It is OK to consult that for composition, but learn to rely on your histogram. If you are not familiar with this, please see the article below.
Read your histogram: Do not be fooled by your camera’s LCD monitor. The preview may serve as a good reference, but a bright LCD monitor on a night can make things appear brighter than they are. Learn to read your histogram. I strongly suggest reading Understanding Histograms from www.luminous-landscape.com.
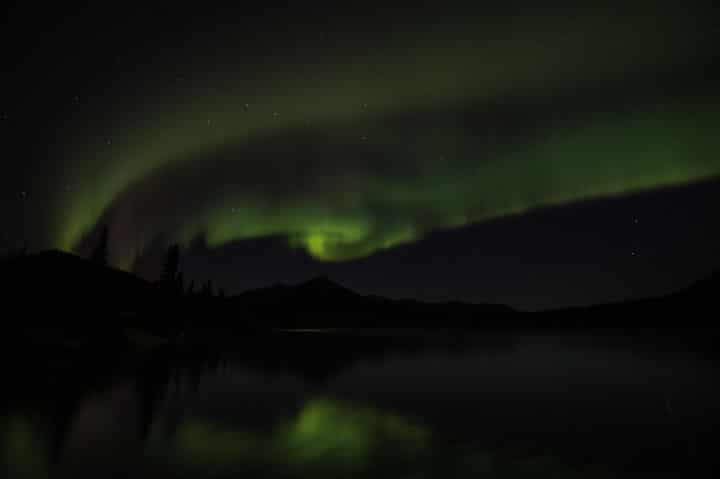
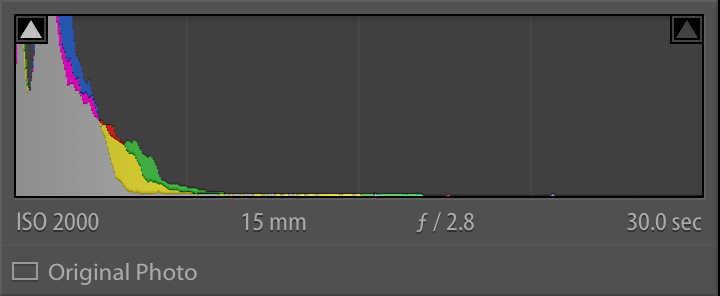
In the absolute sense, there is no right or wrong histogram since a histogram tells you the information about what is in a picture. It is your job to make the histogram reflect the scene you want. Because the aurora has brightness, you want to ensure your histogram shows that. The left side of the histogram represents pure black, and the right side represents pure white. Obviously, on a dark night, you can expect more darks in your histogram, but if the aurora is present, you should also see some values reaching into the mid-tones, as reflected in the second example.
Underexposed
Underexposed as indicated by no brightness in the mid-tones.
Exposed properly
It properly reveals some mid-tone brightness.
Proper Exposure is critical: Even though a RAW file offers latitude for exposure compensation, accurate exposure is imperative, especially when shooting high ISO.
Shoot in RAW format: If you are uncomfortable with RAW, shoot in RAW&JPEG format (if your camera permits it). Even if you don’t know how to process a RAW file, don’t worry. Someday you will be glad you did. Consider the RAW file like a negative. It will always be there, and you can process it anytime.
Generally, on a dark night, I would recommend starting with an exposure of 15 seconds at f/2.8, ISO 1600, and seeing how your histogram looks. Make adjustments based on that first test exposure.
The exact (and correct) exposure values will vary based on the brightness of the moon (or another ambient light present) and the brightness of the aurora. Correcting your exposure is not difficult if you understand how to read a histogram. Especially since you can make adjustments as necessary based on what your histogram tells you.
You can tweak the exposure by adjusting ISO, Shutter, or f/stop based on your lens and camera’s ability to utilize high ISO. High ISO tends to result in grainier images, which will significantly depend on your camera. Reducing time allows you to capture more definition in the moving northern lights. The chart below shows the benefit of an f/1.4 aperture if you want a short exposure time.
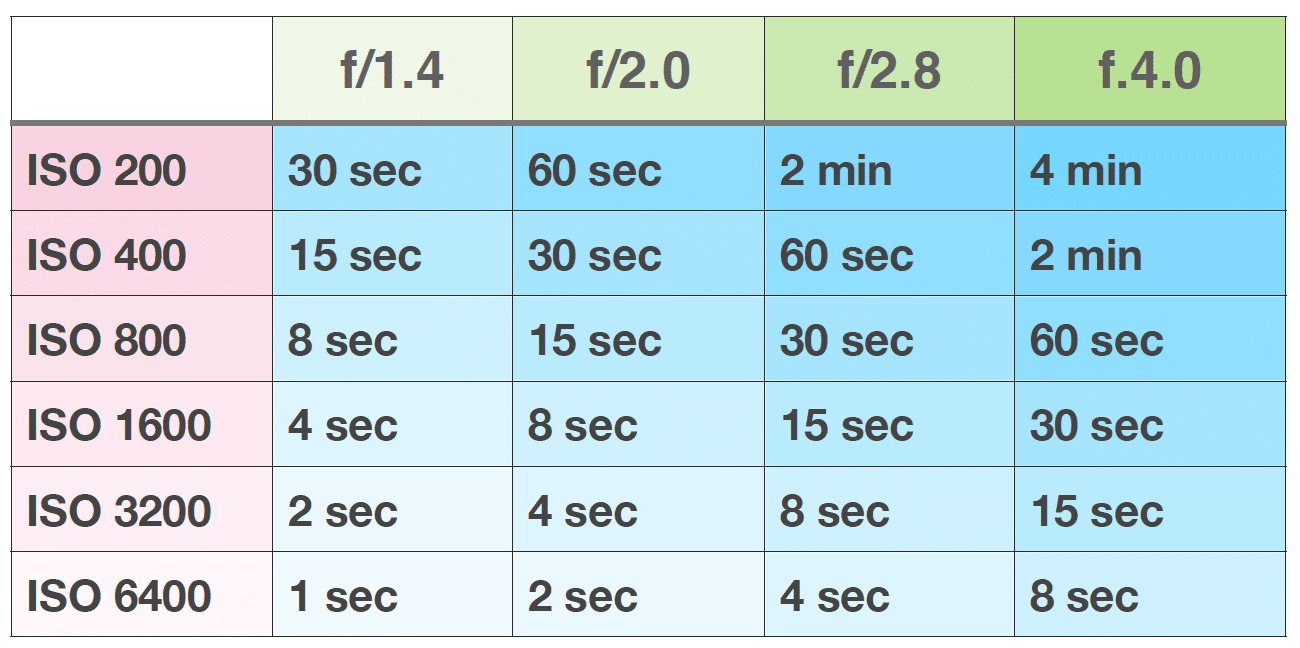
Chart of the relationship between f/stop, shutter speed, and ISO.
Many digital cameras have two in-camera settings that can control noise in a digital file.
High ISO Noise Reduction: This applies to JPEG only. If you are shooting in RAW format, you can ignore this in-camera setting since the noise reduction occurs in the postproduction process.
Long Exposure Noise Reduction: Turn this setting on unless you have tested your camera beforehand with it turned off and are satisfied with the image quality. The pictures should be free of hot pixels caused by a heated sensor. With long exposure noise reduction (LENR) turned on or set to auto, all long exposures (over 1 second on the Canon 5D Mark III) are followed by a second additional frame with the shutter closed. The in-camera software compares the two frames, subtracts the noise, and saves that image. It may slow the LCD preview process, but you can keep shooting.
An excerpt from Canon’s website:
“Some users wonder why this noise reduction feature isn’t always ON at all times. The answer is that using it can slow down your shooting of one picture after another. Here’s why: to do its job, Long Exposure Noise Reduction has to re-energize your imaging sensor and in effect take a “blank” exposure, after your actual picture is taken, for the same length of time. During this time, you cannot shoot another actual picture — the red card busy light on the back of the camera stays on until the process is completed. If you shoot, for example, a 30 second exposure, the camera has to be tied-up for an additional 30 full seconds before your next picture can be taken.”
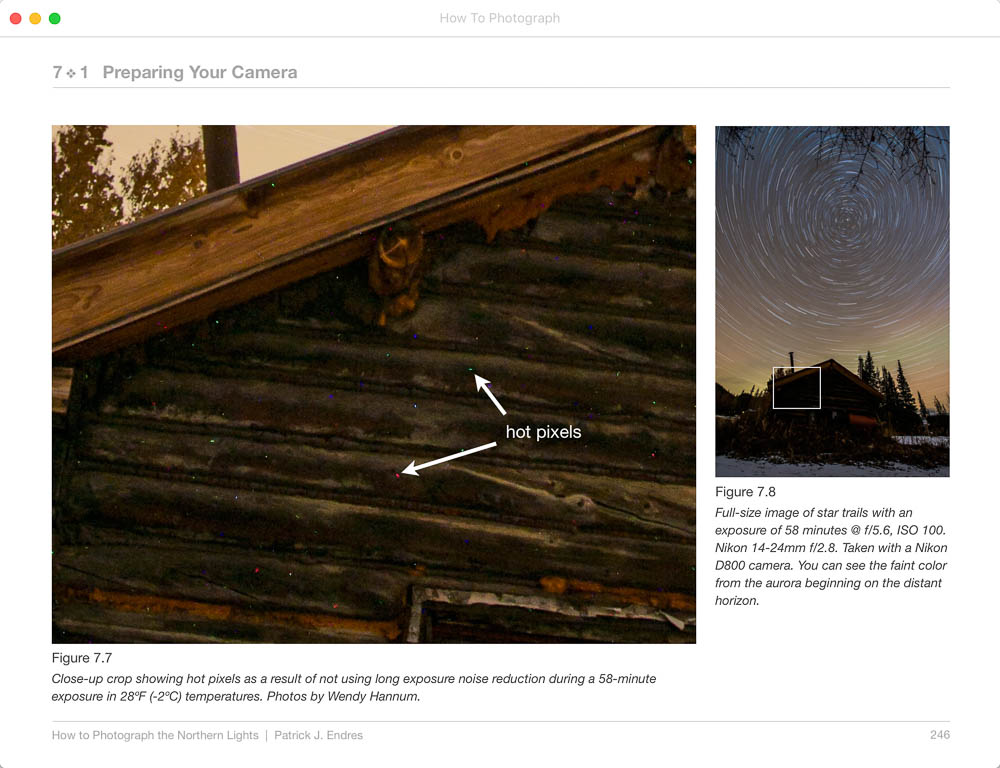
Hot pixels are noted for not using LENR on a 58-minute exposure at 28 degrees F.
There are several programs for making modifications and corrections to raw files:
Google Picasa (free)
Adobe Lightroom (my preferred choice)
In these programs, you will find the tools to address white balance, color saturation and tonality, noise reduction, shadow and highlight control, etc. The question of shooting a raw file over a .jpeg file will be answered immediately!
This subject is addressed in my eBook, with illustrations about what a histogram should look like and other exposure-related details.
What camera to choose and some of the factors influencing your choice.
There are many camera options out there spanning a vast price range, which can be confusing. I photograph with Canon cameras, and the 5D Mark IV is an outstanding, high-ISO-performing camera. Canon’s other digital SLRs and Mirrorless cameras are excellent options as well. Nikon and Sony have a strong lineup, sporting some of the best dynamic ranges currently available.
But all the professional and many semi-pro cameras deliver excellent results; you can’t go wrong with many of them. They all have their nuances, lens selection, and functional differences. It will come down to preference. For example, many photographers love the Sony A7RII mirrorless camera. I wouldn’t say I liked it, especially in the cold—just personal preference. I dedicate an entire chapter to this in my eBook, discussing DSLRs, full-frame and cropped sensors, Mirrorless Cameras, and Micro four-thirds models.
Good performance at high ISO
Has a port for a remote shutter release
The larger the sensor, the better the quality
Can shoot in RAW mode or RAW/JPEG
Battery functions well in the cold
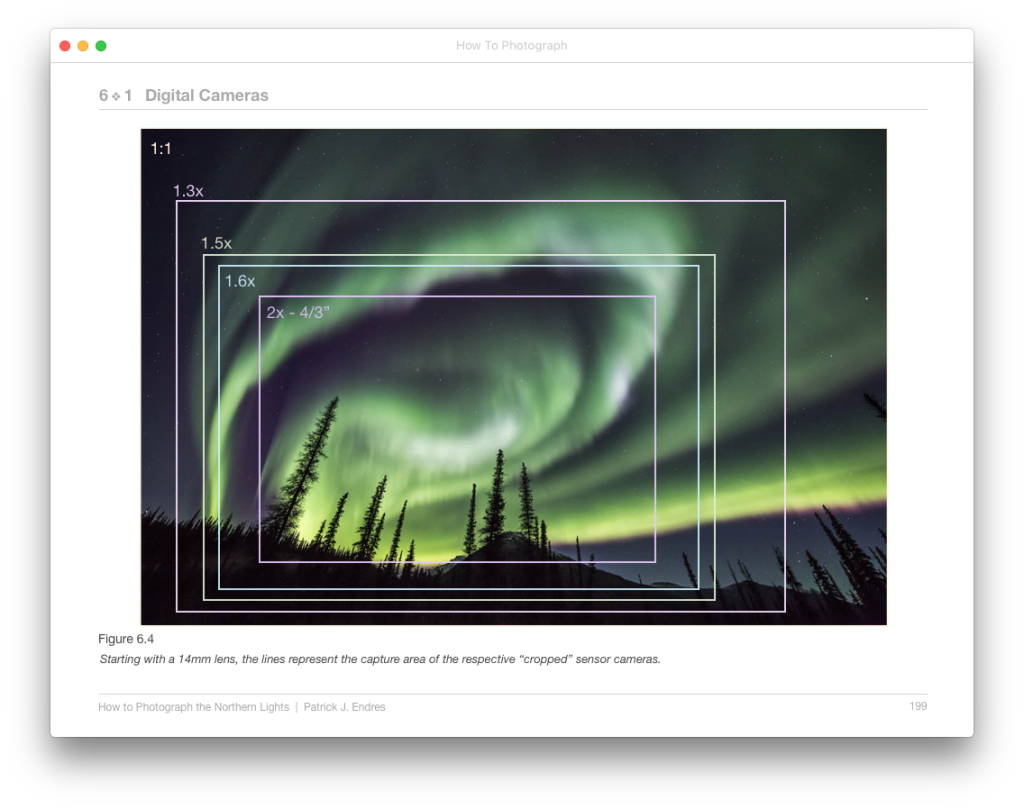
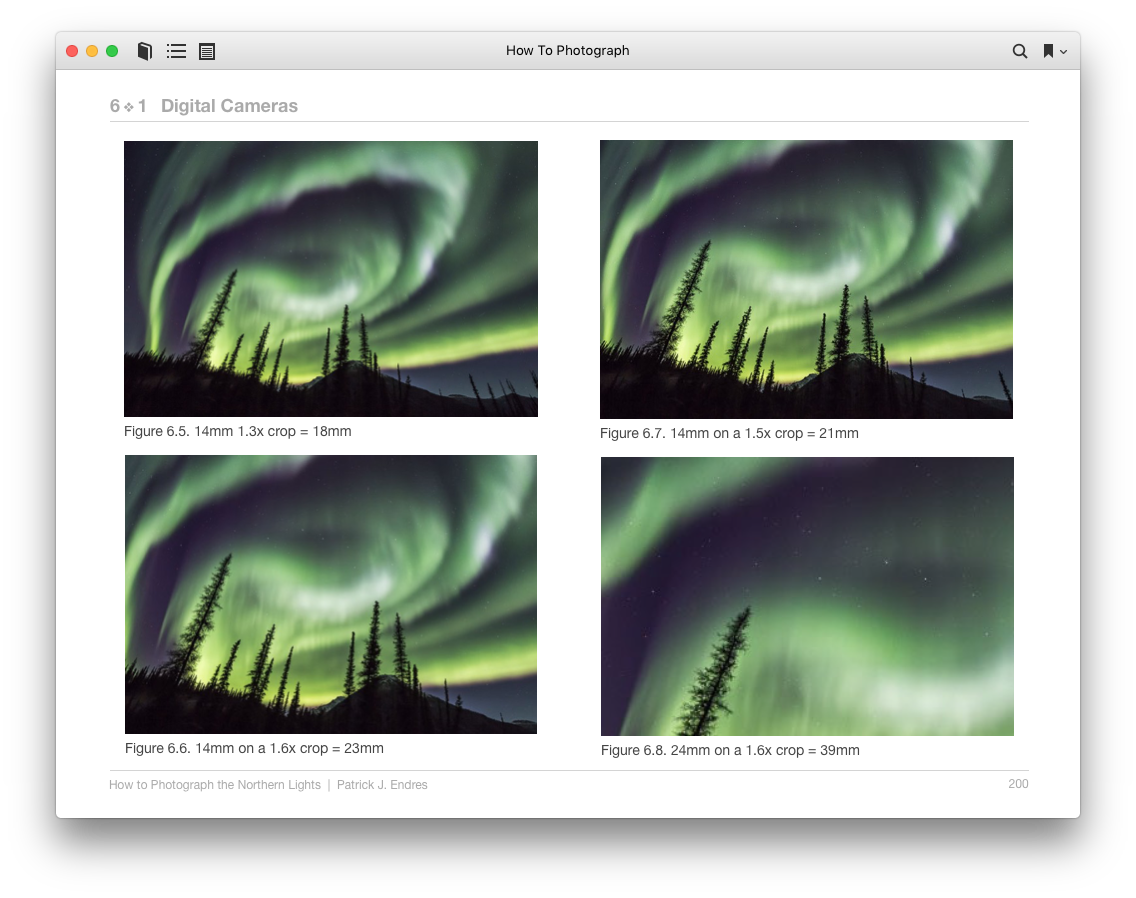
When choosing a camera, one of the most important considerations is the size of the sensor. Using a lens made for a 1:1 sensor (or FX full-frame) camera on a camera with a smaller sensor will result in a crop to the image. Some lenses are made specifically for the smaller sensor cameras but often have smaller apertures (greater than f/2.8) for the wide-angle versions.
See the illustration below for examples of what happens when a lens for a full-frame sensor camera is used on a camera with a smaller sensor. This illustrates the advantage of using a wide focal length lens.
If you are shooting .JPG files (which you don’t want to do), you will want both Long Exposure and High ISO Noise Reduction turned on.
If you are shooting RAW, you only need Long Exposure Noise Reduction turned on (This can be turned off in the Canon 5D III model and some other cameras as well).
There is some debate on the need for Long Exposure Noise Reduction due to the cold temperatures in which aurora photography occurs. Since noise is a function of a heated sensor, cold temps can prevent the heated sensor. I advise you to test your camera first, should you turn this setting off.
While it is not impossible to photograph the aurora with a little point-and-shoot digital camera (or your phone’s camera), it is challenging. I don’t recommend it if your goal is to reproduce images as pints. The models are constantly changing, and perhaps it will become easier.
There are several desirable qualities to look for when considering lenses for aurora photography; as a general rule of thumb, you want as many of the following:
Wide angle
Fast (large aperture of F/2.8 or wider)
Sharp
Minimal vignetting
Inexpensive
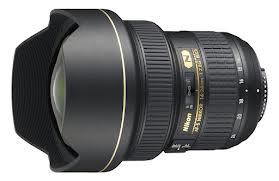
I have not discovered the perfect lens, but two general ultra-wide-angle zooms work well. Other lens manufacturers, like Tamron, Tokina, Zeiss, etc., offer mount lenses available to fit Nikon, Canon, Sony, and other cameras, and they have some outstanding options. I discuss this more thoroughly in my eBook:
Canon 16-35mm F/2.8 USM Good optical performer, but not exceptionally fast. A bit expensive but versatile for aurora and excellent for general daytime landscapes.
Nikon 14-24mm F/2.8 G ED Excellent quality, autofocus lens but loses that function when used on a Canon with a converter.
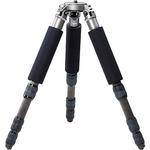 A tripod is essential for aurora photography. A tall tripod will be more comfortable as you aim the camera toward the sky. Squatting under a short tripod while cranking your neck can quickly become uncomfortable. (NOTE: A good ballhead and tripod are essential. On photo tours, I see many frustrated people whose small tripods and flimsy ballhead break or operate so poorly that they miss many photo opportunities. A good tripod is worth it.)[
The Manfrotto MT055XPRO3 tripod, although on the shorter side, is a good inexpensive tripod. It even has built-in leg pads to protect your hands from cold metal.
The series of tripods by Really Right Stuff are exceptional and expensive tripods. They are lightweight and made of sturdy carbon fiber.
Ballheads are preferred over pan/tilt heads. Kirk Enterprises makes the BH-3; it is a great smaller ballhead. Really Right Stuff also has some excellent ballheads.
Foam pads on your tripod legs will help keep your hands warmer.
If you get a tripod with a center column, the ability to remove it can be advantageous for close-up photography. Additionally, one should not rely on expanding the center column completely for aurora photography since this makes the camera less stable and susceptible to wind movement during long exposures.
Shutter Release: Prevents camera shake and allows for exposures over 30 seconds. (Some wireless remotes only offer exposure options of 30 seconds. Make sure to check the version you have if you plan on using a wireless remote)
Batteries: Have a few batteries at your disposal. Keep them warm in a parka pocket.
Chemical Hand warmers: I use them all the time. They can be kept inside an over-mitt or in your coat pocket for quick hand-warming.
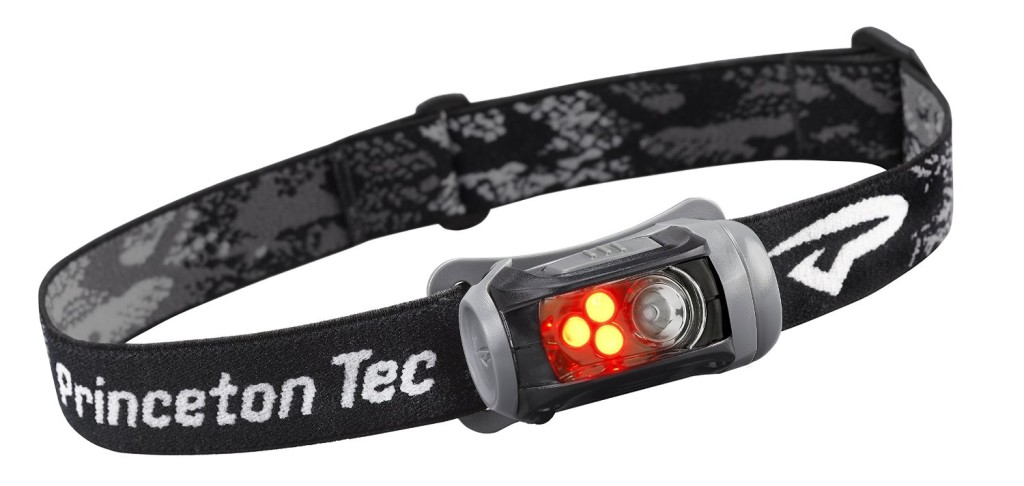
Headlamp:
A headlamp allows the use of both hands while handling your camera. Consider the on-off switch before purchasing since you will operate the headlamp with gloves. The Princeton Tec Remix Headlamp is a good choice.
Properly setting up your camera and lens is essential for successful aurora photography.
Setting up your camera and lens is essential for successful northern lights photography. Let’s review a few of the basic steps. There is a large variation in camera models; therefore, some specific settings may vary slightly depending on your model. If there is a significant variation in the intensity of the auroral displays, and you have a fast lens, you can shoot in Aperture Priority mode; otherwise, Bulb or Manual mode is best. I shoot in both Aperture and Manual modes depending on the circumstances and lens choice. As you get familiar with judging the intensity of the aurora, you can make accurate estimates of exposure times, should the brightness of the aurora change in considerable amounts-which is often the case throughout the night.
Set your camera to Aperture Priority mode (or manual) if exposure is under 30 seconds. If exposure is over 30 seconds, switch to Bulb.
Set your lens f/stop at its largest opening (f/2.8 or larger)
In Aperture Priority mode, a slight overexposure tends to be helpful, perhaps +1 to +1-1/2 of a stop. (This varies greatly depending on your camera model. It can be up to four stops on some camera models. Experiment and review your histogram.)
Using Bulb mode: If your exposure exceeds the in-camera timer of 30 seconds, switch your camera to Bulb mode. Plugin your shutter release (some cameras have built-in intervalometers). Your exposure will continue as long as you hold the release button down. Be aware of the helpful clock that counts in seconds on the camera’s top LCD panel.

Filters on a lens can cause concentric rings to appear in the center of an image (this is a crop). Be sure to remove the filter when photographing the aurora.
TAKE OFF YOUR LENS FILTER!!
When photographing the aurora, removing the filter from your lens is essential. Why? Look at the photo to the right, and you will see a series of concentric rings at the center of the image. This can be a disheartening discovery after a night of shooting the aurora since the rings are very difficult to remove, with even the best Photoshop geek on the job. What causes the rings? Charles Deehr, a professor emeritus in physics at the University of Alaska Geophysical Institute, says:
“These are interference fringes due to the parallel faces of the filter and to the narrow spectral emission at 5577 Angstroms in the aurora. That green, atomic oxygen emission line is the strongest emission in the aurora near our film and eye peak sensitivity, so it shows up first when there is any device in the optical path which sorts out the spectral emissions.
Pre-focusing your lens: Don’t overlook this critical step. I have found this to be the biggest problem with photographing the aurora. With the new genre of autofocus cameras and lenses, a tolerance is built into the lenses to accommodate temperature changes. For this reason, you can’t manually turn the focus dial to infinity and be confident it will be in focus. The old manual lenses worked this way, but the new ones don’t. (A few manual focus lenses still work this way, like the Zeiss 21mm f/2.8, but even those should be checked to ensure.)
Because of this, there are two ways to focus your lens. In my experience, pre-focusing by using autofocus during the day has worked well for most lenses except for the wide f/1.4 lenses like the Canon and Rokinon 24mm 1.4L. For these lenses, it is necessary to use the live-view function (if your camera has it–most DSLRs have it). Achieving focus and using live view is discussed in depth in the full version—it can be more challenging than you might think.
Before it gets dark, focus your camera on a distant “infinity” focal point, like a mountain horizon.
Find a bright object in the sky (not the moon) and center your camera on it by looking through the viewfinder.
Turn on live view and maximum zoom in on the object and adjust until sharp.
Working in the field.
Finally—now that you have invested in a camera, lens, tripod, ball head, cold weather clothing, equipment, and most likely travel—it’s time to go into the field and try the actual shooting!
By now, you are well on your way to answering the question of “how to photograph the northern lights!”
Long exposures: Remember that long exposures chew up batteries quickly.
Keep them warm: When waiting for the aurora in extremely cold conditions, I remove the flashcard and battery and put them in my pocket. When the action happens, I quickly put them back in the camera and start shooting.
Although I have one with me, I rarely use a headlamp during the night. It may seem awkward initially, but night vision becomes well-adjusted after 10 or 15 minutes as your pupils dilate. You also need your headlamp less if you’re familiar with your camera’s features and buttons making it easier to operate in the dark. Practice, practice, practice!
When Using Your Headlamp:
Be sure it is on its dimmest setting.
Limit use to retain night vision. Use it as little as possible, and turn it off immediately. Night vision helps you see and compose more critically on a dark night.
Use a red filter/gel. This feature is standard with most headlamps.
Point it downward. This helps prevent your light from shining in your and other people’s photos.
Avoid looking directly at others when wearing it. They will like you for this!
Have a spare battery nearby.
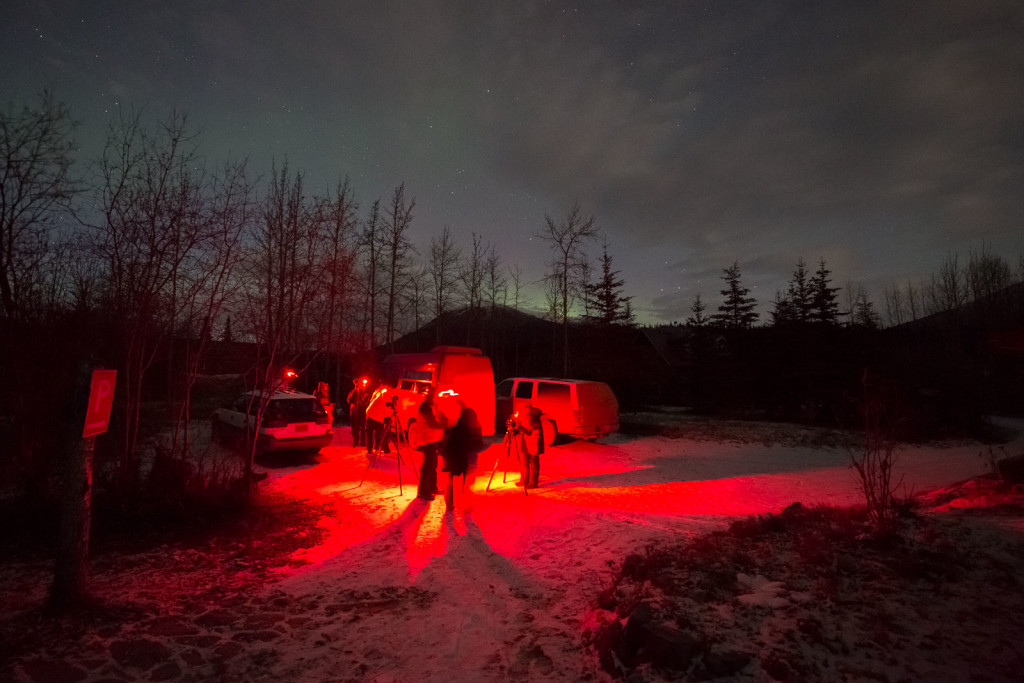
Beware how much light pollution even a tiny headlamp with a red filter can contribute. Use it as little as possible and point it downward.
Before you begin your aurora photography adventure, here is a brief review and some final considerations.
Shoot in RAW format
Set LCD Brightness to low
Remove the filter from your lens
Pre-focus your lens on infinity or use live-view with loupe
Test exposure, consult histogram
Test exposure, consult histogram
Test exposure, consult histogram
Have 2 batteries and 2 flash cards
Use a tall, but sturdy tripod
Check the aurora forecasts
Use your lens hood to protect against frost/condensation on your lens
Put black tape over your red processing light under the wheel (for Canon users-your fellow photographers will like you)
Finally, good luck, and have fun! Getting yourself in the right spot with clear skies, good aurora activity, and smooth working gear can take a few attempts.
Put in the time. Persistence pays off.
Don’t give up early.
Enjoy the wonders of the night sky.
Don’t give up early.
When in the dark, wear something with reflective material.
Stay alert and walk carefully in the dark. Snow and ice can be slippery.
Don’t drive when sleep-deprived.
Be considerate of your fellow photographers. Practice good light-pollution-free etiquette.
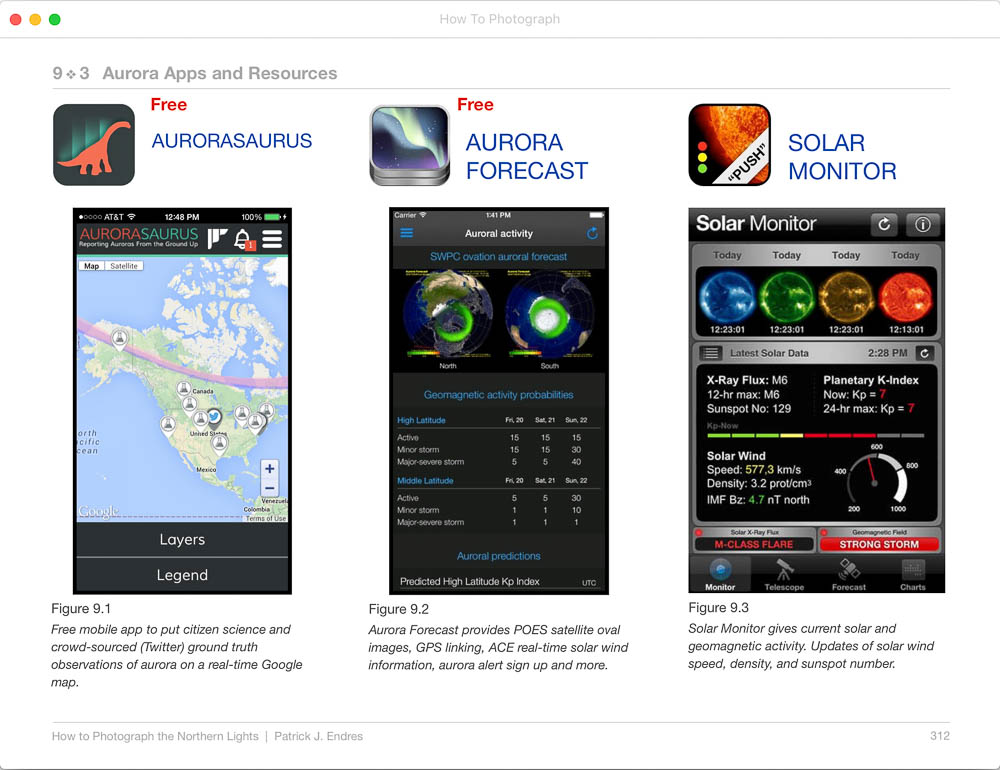
Various apps are valuable resources.
Well, there you have it! You should have enough information to be on your way to photographing the northern lights. Believe it or not, there is much more to discuss on this subject, and I’m sure you did not think I’d let you get this far without making one last plug for my eBook.
There is material in the ebook for both the beginner and the professional. If you are serious about photographing the northern lights or investing in a trip to do so, I strongly suggest you get the full version eBook. I know; it sounds like a cheesy book pimp since I’m the author. But, based on my experience, after guiding aurora photography tours for two decades and seeing many common mistakes—not to mention making many of my own—the cost is a trifle in the big picture of an aurora photography excursion. Even now, when guiding aurora trips, I have all the guests read the eBook before the trip, which significantly affects the outcome of their photos. Of course, having a guide is a great asset, but even they assure you that the more you practice ahead of time and the more information you have, the happier you will be with the results.
There is a considerable investment in time and money to get yourself well-positioned to photograph the aurora. That investment is too significant to sacrifice to the misfortune of being unprepared. I only wish there had been a resource like this when I started; I would have thrown away fewer pictures!
Read a full review of “How to Photograph the Northern Lights“
 Buy downloadable PDF
Please link back to this page when sharing. Thank you ~ Patrick
“If you dream about chasing the Northern Lights, buy Patrick J. Endres’ book because it will strengthen your resolve and encourage that dream. If you plan to try to see them, this book is an essential read. As we would expect from Patrick, it is magnificently illustrated with thought-provoking quotations, but it is much more than a pretty ebook. This is a substantial and authoritative work, with contributions on the science of the aurora borealis from Neal Brown. Yet it is a compelling and enjoyable read and extremely well laid out. You will learn where, when, and even what time to photograph the Northern Lights, how to prepare, what to wear, how to capture them on camera, and much more. This is the book to read on the Northern Lights.”
Cecily O’Toole
“This book is the authority on photographing the aurora. Beginning photographers to seasoned pros will learn valuable tips from Patrick’s vast experience photographing Aurora in the far north. Patrick explains photographing the aurora and shares valuable information on predicting displays, dealing with the cold, and composition guidelines. All this is illustrated with stunning Aurora Borealis images.”
Tom Bol, Professional Photographer
“I just wanted to take a moment to say Thank You for writing your book, “How to Photograph the Northern Lights.” It had been a dream of mine not only to see but to photograph the Northern Lights since I saw a photo of them as a teenager… 40 years later, it happened. I just returned from a trip to Fairbanks, and I read your book many times before leaving and then practiced everything I read before my trip. Your book prepared me for everything from the weather to ensure I had the right camera, lens, and settings, and how to use the Aurora Forecast data. Your book was my bible and made my dream a complete success. So, Thank You for making my dream a reality!”
Thank you and Best wishes, Kyle Moore
“I’m pretty sure you’ll not remember, but I got in touch two years ago after buying your first edition, and you were kind enough to point me in the right direction for a handful of locations in and around Fairbanks to shoot the lights… Thank you for inspiring, teaching, and, most of all, for being passionate about the aurora. I can completely understand where the passion comes from, speak non-stop about it to anyone who will ask, and I am currently looking for a way to head north for at least a month next time ;). It takes a good teacher to share your skills and understanding of photography and the aurora, and sharing it so openly is a credit to you.”
Thank you Patrick, Kind regards, Neil