If you have been tracking the development of RAW image processing programs, then it should be getting increasingly more clear that the need to generate derivative .tiff or .psd files of your master RAW files is getting increasingly less necessary. In the beginning days of processing RAW files, it was cumbersome, slow, and in general a painful experience. I used to generate tiffs from RAW files and finalize them in Photoshop. But that took a lot of time and hard drive space. Furthermore, with each successive advancement in RAW processing algorithms, tonal control and other global and local correction options, I found myself redoing files over and over.
At this point I use RAW files almost exclusively as master files, the exceptions are for blending multiple images or stitching panoramas. I use a two stage process:
- A general processing effort aimed at making the file look excellent on my website–at this stage it is not necessary to stamp out every piece of dust, correct chromatic aberration, etc.
- “Perfecting” the file happens when the image sells as a stock photo or art print. This lets me capitalize on the newest and latest RAW file processing techniques and algorithms available at the time the image leaves my office. Read more about my digital workflow here.
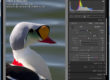
I use Photoshop infrequently these days, and often for correcting lens distortion–something not fixable in the current version of Lightroom. I shoot with zoom lenses often because I like the flexibility they afford in composition. They are often notorious for various types of lens distortion and chromatic aberation. The ability to fix this on a RAW file has been on my wish list for a while, and I’m excited to learn that Lightroom 3 will offer this very useful feature. I’ll be able to correct for things like pin cushion, barrel distortion, and other optical nuisance within the RAW working environment! . Watch Tom Hogarty, Adobe Systems Product Manager, in this short demo of the upcoming Lens Correction feature that will be part of Lightroom 3 and Camera Raw 6.
These new lens correction tools, in conjunction with the existing ability to maximize dynamic range from one single RAW file in Lightroom, will make it an even more powerful tool in effective, creative and efficient RAW file management. The latter three reasons are why I think every digital photographer should use it, or it’s equivalent in some other platform. Next post I’ll discuss a technique I use to maximize the dynamic range of a single image, avoiding the need for an in-the-field, split graduated neutral density filter.


Hi Patrick,
I’m looking forward to LR3 too. And a little LR shortcut I got told recently which I find really useful: In the Library mode, if you select say 10 photos, press N to see them all displayed together and then you can click on the X on the ones you don’t like to eventually eliminate down to the best shot. This has been really helpful to me.
Hope all is well,
Sam
Sam, I have not used that method but will give it a try, thanks for sharing.
I love the blog, Pat. Just went through a bunch of your posts on workflow and really enjoyed them. I have been playing around with LR 3 and love it, although I didn’t know about that trick of Sam’s. That should come in handy.
Joe
Joe,
Thanks, It is certainly worth the time investment to get a good workflow down. And learn a few shortcuts along the way. Sam’s suggestion is helpful, “N” being the shortcut of survey mode. With a large monitor I find I can usually get by by picking the one I like the most just by viewing, and not needing to click X to get rid of the ones I don’t want. That can help however, since clicking X on one makes the others get larger per the screen area.