Tips: How to photograph the aurora borealis
By Photographer Patrick J. Endres
Updated 12/20/2024
Updated 12/20/2024
I’ve taught photographers how to photograph the aurora borealis (northern lights) for decades. While digital cameras offer real-time feedback in the field it has not removed the need for experience or being well-informed about the many factors necessary to make aurora photography a success.
Below are excerpts from a tutorial ebook I wrote on “How to Photograph the Northern Lights, which is now in its 3rd edition. I teamed up with the former University of Alaska aurora scientist Neal Brown, who offers scientific explanations about the aurora.
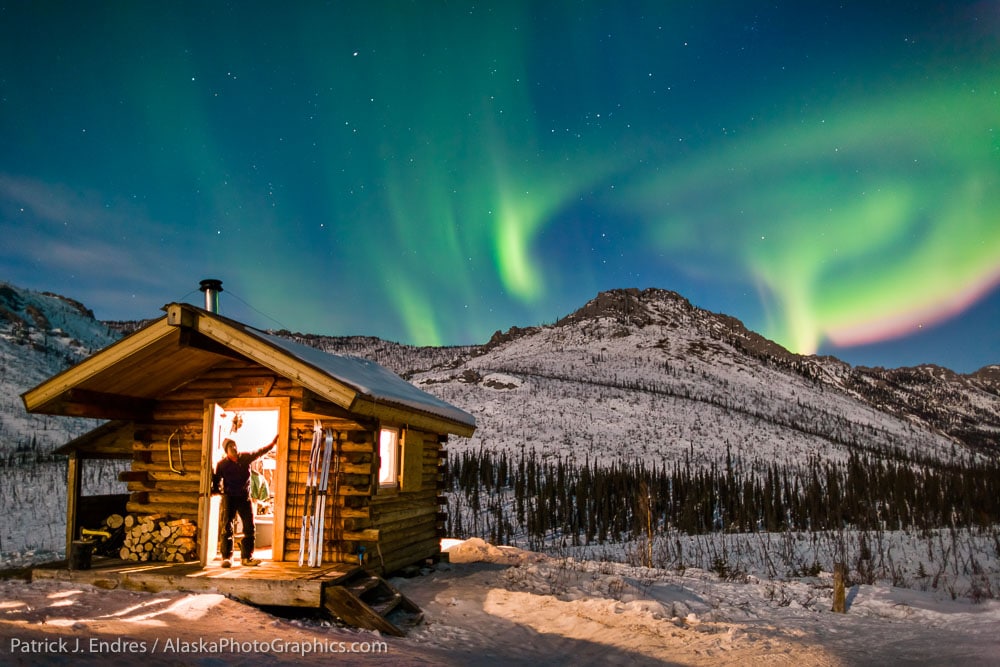
A self-portrait I took years ago while on a photo excursion to the Caribou Bluff recreation cabin in the White Mountains National Recreation Area, Alaska.
Aurora Science and Forecasts
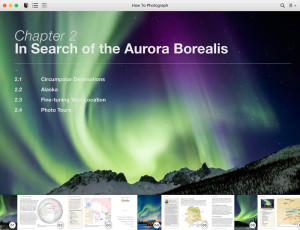
In Search of the Aurora
Timing Seasons and Weather
Dealing with the Cold
Aurora Exposure
Choosing Cameras and Photo Gear
Preparing Your Camera
In the Field
Wrapping it Up
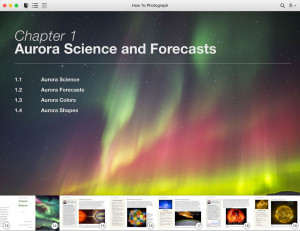
Screenshot from my eBook. Aurora science and forecasts.
It was only 100 years ago that scientists discovered that the sun was responsible for the northern lights. Since then, we have come a long way in understanding space science. The National Aeronautics and Space Administration (NASA) Heliophysics Research Division has made significant efforts better to understand the sun and its effects on Earth. Scientists have collaborated to monitor how, why, and when solar storms happen, and we aurora photographers benefit from the knowledge they share.

The aurora are caused by solar storms that throw vast numbers of fast-moving electrons and protons away from the sun in a twisting mass of electric and magnetic fields. These microscopic particles typically take two days to travel 150 million kilometers from the sun to Earth.
These energetic electrons and protons initially move past Earth for several thousands of miles before traveling back along Earth’s magnetic field lines into Earth’s atmosphere. Then, through a process similar to a neon sign, they collide with the atoms and molecules of Earth’s atmosphere to create the light we call the aurora. Not all solar storms produce aurora. Only if the solar storm’s magnetic field couples with Earth’s magnetic field do we have a chance to see auroras.
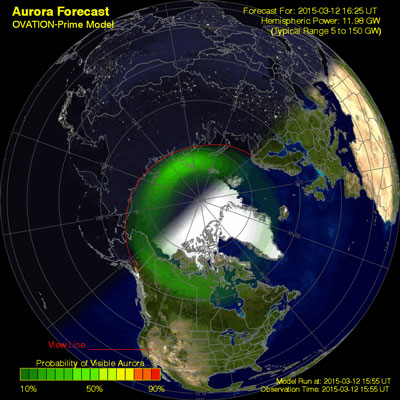
Even the smartest aurora scientists will tell you that predicting the aurora’s presence on any given night is far from a perfect science and includes many changing variables. Many resources that help give some idea of northern lights activity exist on the Web. Here are two worth noting:

The band represents the AK’s range and extent of aurora borealis visibility. The graph is not a current prediction; click to check the current status.
POES website: Aurora activity approximated in color bar representation. This image is updated every 10 minutes. See the date stamp in the graphic.
The solar storms that create the aurora often last several Earth months, with the aurora recurring every 27 days. The 27-day solar cycle is because the sun turns on its axis once every 24 Earth days. For example, a spot on the sun’s face rotates once every 24 Earth days until it again faces Sirius, the dog star. But Earth orbits the sun once every 365 days. So in 24 Earth days, Earth will have moved its orbit such that the sun needs to rotate the equivalent of 3 more Earth days for the stormy spot on the sun to again line up with Earth. Why the aurora recurs on a 27-day schedule was a mystery until astronauts obtained images of the solar storms in ultraviolet light that is absorbed by Earth’s lower atmosphere. Today, satellites regularly provide ultraviolet images of solar storms.
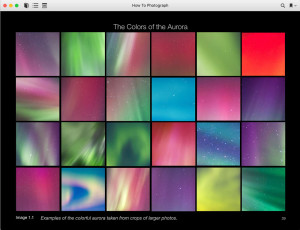
A sampling of aurora colors from some of the photos I’ve taken.
The atmospheric gas determines the color at altitude (mainly atomic oxygen and nitrogen), its electrical state, and the energy of the particle that hits the gas. The colors of the aurora are made up of red, blue, and green light emissions. Other colors may be seen as a mixture or blending of the three.
When evaluating an aurora picture on my camera’s LCD, I’m often shocked by the colors I see that are not visible to my naked eye. The camera captures a much more vibrant color when you can only see the faintest bit of color with the human eye. I’ve learned to shoot test shots often; you may be surprised by the colors your camera captures.
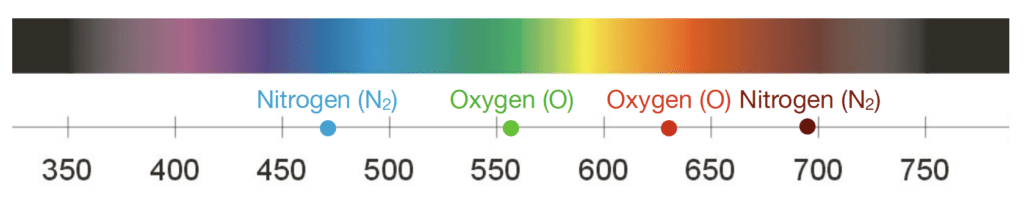
Color wavelength chart in nanometers. Some aurora colors, such as the deep reds, occur on the very outer edges of the color spectrum and are difficult for the human eye to see. Cameras can capture those colors much better, so your pictures reveal colors you can’t see with your naked eye.
The colors of the aurora change depending on which sun storm electrons and protons collide with which atoms and molecules in Earth’s atmosphere. The green light and the deep, broad red color that often occur high in Aurora appear when electrons collide with atomic oxygen atoms. The bluish-tinged vertical rays in the aurora appear when electrons impact singly ionized nitrogen molecules. The brighter lower borders of some aurora appear when electrons affect nitrogen and oxygen molecules and may briefly appear magenta. Faint broadband of blue that runs from magnetic east to west and just south of the greenish aurora appears when protons impact hydrogen atoms in Earth’s high upper atmosphere.
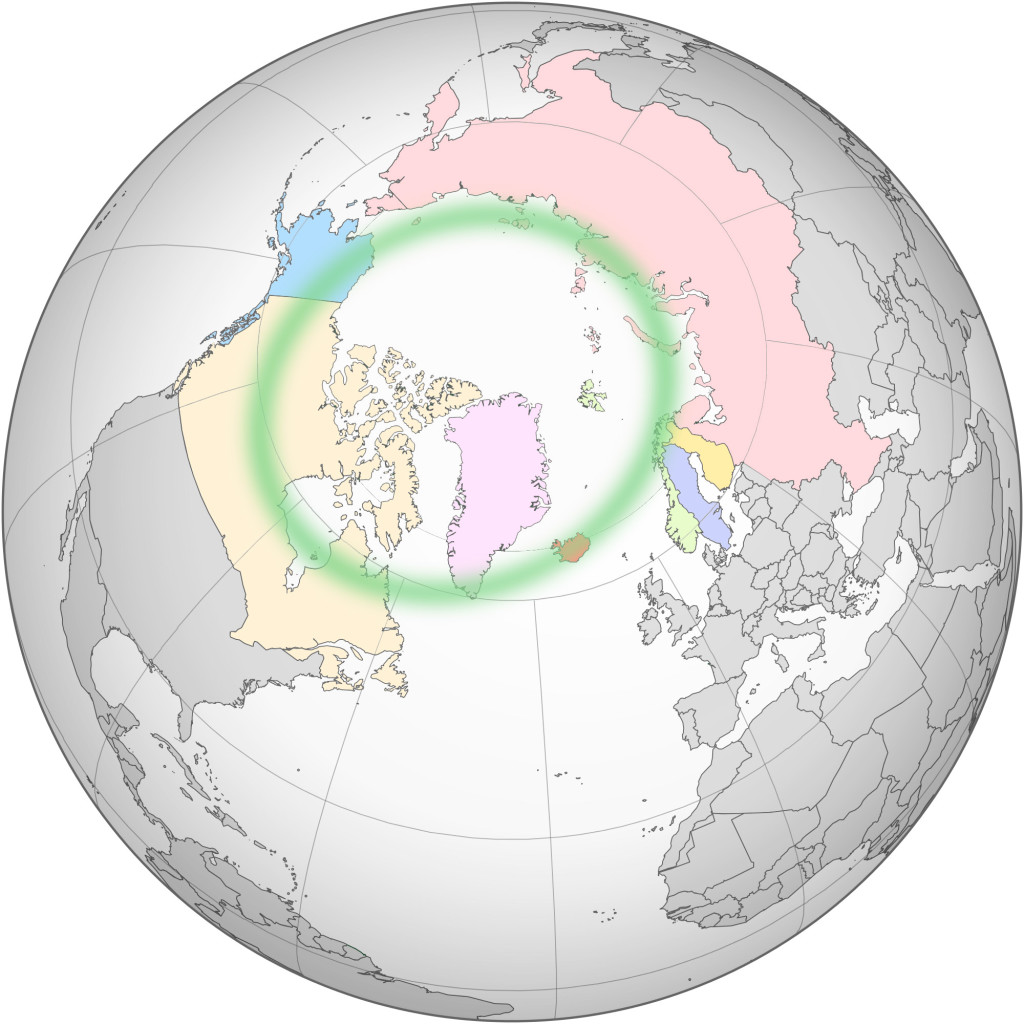
The auroral belt encircles the geomagnetic north pole, and in this zone, the aurora can be seen approximately 250 nights a year.
Because the aurora are drawn to the earth’s northern and southern magnetic poles, latitudes closer to the poles offer excellent opportunities for viewing auroral displays. The “auroral zone” (also called “belt” or “oval” is the region in the circumpolar north where the aurora borealis can be seen approximately two-thirds of the year. This region reaches all eight circumpolar countries. While the chances of seeing the aurora are statistically much more significant in the aurora belt region, it is unnecessary to travel there to see them.
During large geomagnetic storms, the aurora oval expands, and the northern lights can be seen in more southerly latitudes. However, this may happen on a much more limited frequency. In the U.S., Alaska is the only state under the aurora belt. Because the aurora is drawn to the earth’s magnetic poles, far northern and southern latitudes offer excellent opportunities for viewing auroral displays.
Chapter discusses the various locations for watching and photographing the aurora.
Some points to consider when selecting a location for aurora photography:
Geographic Latitude: It would be ideal, although not necessary, to find a spot within the auroral belt. (According to Dr. Syun-Ichi Akasofu, this is the polar region where the aurora is visible about two-thirds of the year). I live in Fairbanks, about 65 degrees latitude, which is geographically well situated for aurora viewing.
Light Pollution Free: Go somewhere free of light pollution, far from city lights or airports.
Direction/Orientation: Most of the shooting orientation will be between the northwest and southeast sky. With this in mind, position yourself to shoot with light sources (towns or cities) to your south. When extreme solar storms hit the earth’s atmosphere with strength, the northern and southern sky will contain the aurora, often in some wild colors.
In the United States, Alaska is the clear winner as an aurora borealis photography destination because of its proximity to the aurora belt. Additionally, the mountain landscapes of northern and interior Alaska make outstanding foregrounds for diverse and compelling photo compositions. In Alaska, the “auroral belt” or “zone” occurs between a 3° to 6° latitudinal range, near 70° N. I live in Fairbanks, Alaska, situated at latitude 64.8° N, just below the auroral belt, and offers excellent aurora viewing and photography opportunities.

Fairbanks, Alaska, is located between two mountain ranges, with a dry, cold climate and frequent clear skies.
I live in Fairbanks, Alaska, situated at latitude 64.8° N, just below the auroral belt, and offers excellent aurora viewing opportunities. Fairbanks International Airport provides relatively easy access to perhaps the best launching place for aurora photography in the United States. Whatever you decide to do, flying into the Fairbanks International Airport is a good start. There are vehicle rental companies and many hotels or B&B accommodations to choose from should you make Fairbanks your base to explore independently. Traveling the paved and relatively well-maintained roads that lead out of town within a 60-mile radius allows you to find plenty of locations suitable for aurora photography.
Fairbanks, Alaska, offers unique advantages for those who want to see and photograph the Northern Lights. The great east–west stretch of the Brooks Range to Fairbanks’ north and the Alaska Range to the south block movements of moist air and clouds. This gives Interior Alaska (and Fairbanks in particular) a dry continental, cold climate, and frequently clear skies. The crown of light, the typical oval of Aurora, hovers around Earth’s magnetic poles and varies in its southern reach depending on the strength of solar storms. Most nights, this puts the northern aurora oval right over the top of the south part of the Brooks Range of Alaska, near Fort Yukon. Auroras line up on Earth’s magnetic latitudes and longitudes, so when looking for auroras, it’s more important where you are in relation to the magnetic north pole than the geographic north pole.
Chena Hot Springs Resort, located along the Chena Hot Springs Road just 65 miles east of Fairbanks, takes guests on night excursions to see and photograph the aurora. You can combine a few nights at the resort with exploring the broader Fairbanks vicinity. One-night guided excursions in the Fairbanks area are also available, and companies providing this service are increasing.
If you do plan to explore on your own, practice attentive driving. Photographers are known for looking at the landscape instead of the road. This can be precarious, especially at night. While road surfaces are generally in good shape, icy conditions in Alaska’s Interior are common in the winter. Exploring the areas ahead of time, during the daylight, is safer. Stop and pull off the road to check out the night sky, and don’t drive sleep-deprived.
Driving north of Fairbanks on the Dalton Highway in winter can be very treacherous, and it is not recommended unless you are a veteran winter driver. Your vehicle should have the necessary safety equipment, including a CB radio, road flares, spare tires, cold weather gear, emergency gear, jumper cables, tow rope, etc.
How critical is the timing?
March is the most geomagnetically active month of the year; October is a close second.
Aurora activity is directly connected with solar storm activity on the sun’s surface. Therefore, awareness of this will help determine the optimal times for viewing the most active aurora displays.
According to SpaceWeather.com, statistically speaking, March is the most geomagnetically active month of the year; October is a close second. Although the reasons are not fully understood, there is no doubt that equinoxes favor auroras. The percentages are not hugely different than other months.
The data from their website plots geomagnetic activity per month overlaid with the cloudiness factor in the diagram below from my eBook. Remember, however, that clear skies can be equally, if not more, productive from a statistical perspective.
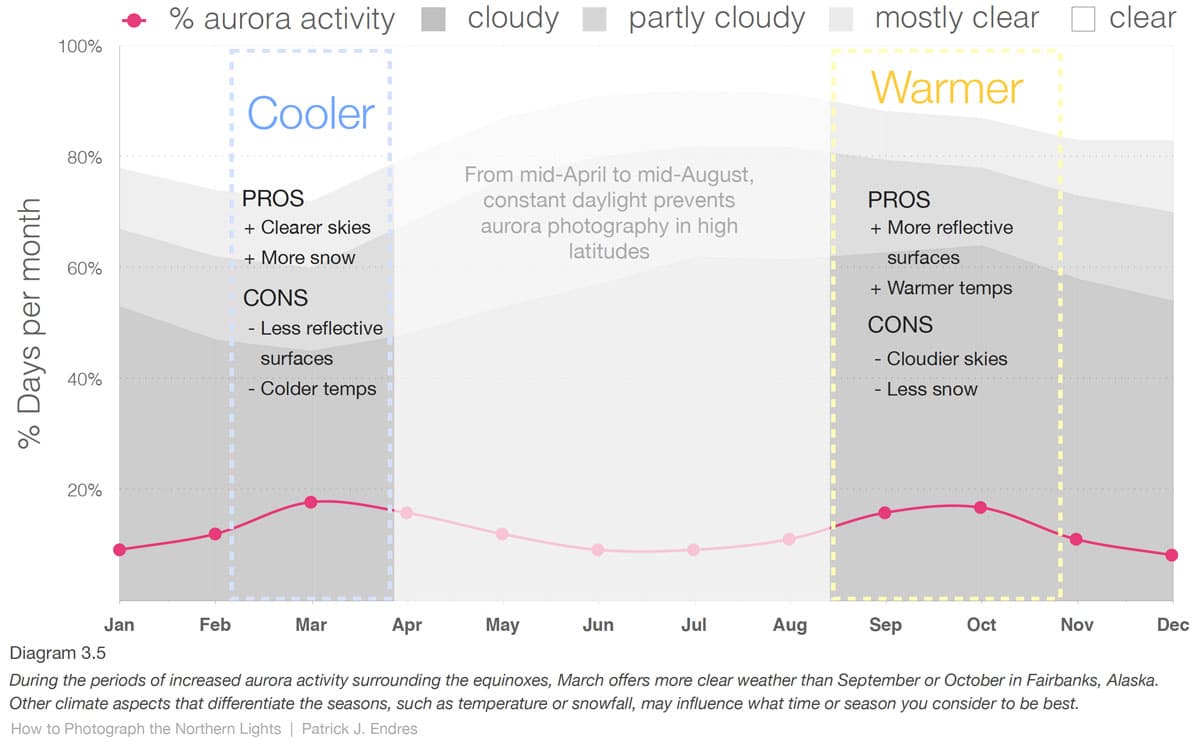
Diagram from How to Photograph the Northern Lights eBook.
I’ve photographed the aurora during all phases of the moon’s presence.
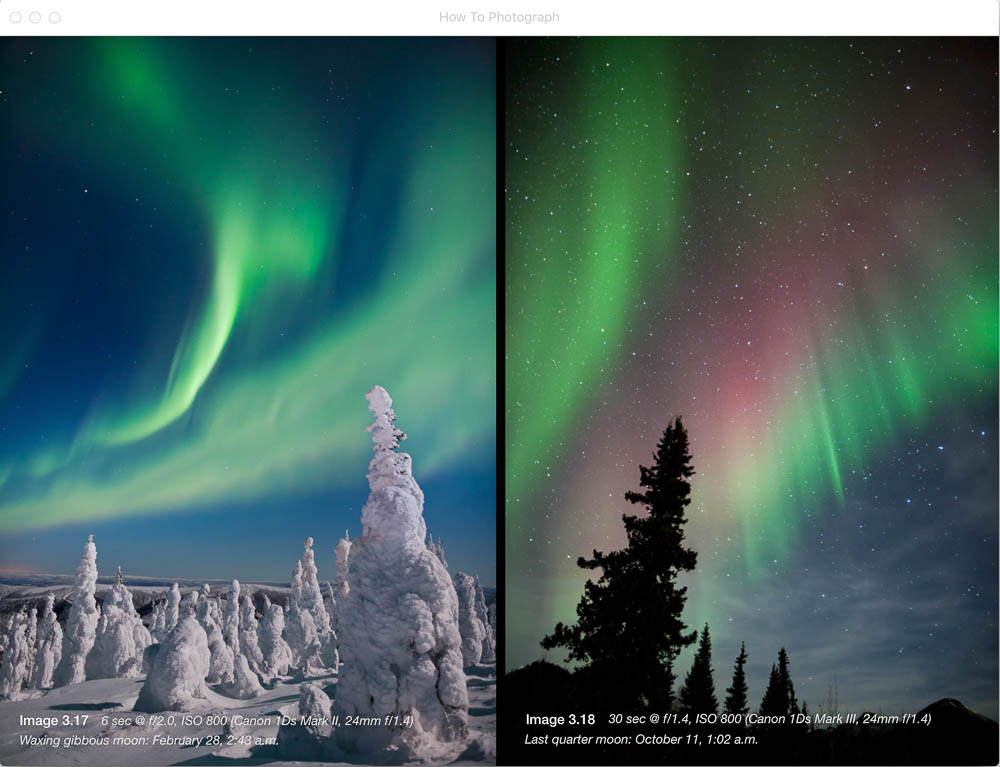
Two photos show the difference between the presence of a moon and the absence of a moon.
Predicting the best time of night to view the aurora is difficult. There are, however, some generalizations and statistical averages:
Stay awake and be ready. I’ve never had much luck going to sleep and waking periodically to check. The show can easily be over when you get dressed and prepare all the camera gear.
Plan to spend a chunk of time viewing. The aurora displays and activity follow a somewhat predictable pattern. Whether it is a homogenous arc, a rayed arc, or a corona, they present different photo opportunities at other times of the night.
Sunlight causes the sky to glow in ultraviolet light on the side of Earth next to the sun. The aurora causes the auroral crown of light over the northern hemisphere, which is the brightest in the midnight sector on Earth, away from the sun.
However, the brightest aurora is visible not at midnight by the clock but at magnetic midnight. That is when the magnetic pole of Earth, which is offset 11 degrees from the geographic pole, or Earth’s spin axis, is opposite the high-noon sun on the other side of Earth.
As Earth spins on its axis, during the half-hour before and after magnetic midnight, there is an arc of proton and light electron emissions that cause the aurora to go crazy and “break up” in bright, fast motions.
The chapter addresses how to deal with the cold, including recommendations for clothing and gear.
Because aurora viewing is best in Polar Regions, you will likely experience cold weather. Sometimes, frigid weather, especially if you are visiting Alaska in the winter. If cold weather freaks you out, consider late September or early April. The temperatures are slightly warmer then, but the skies are still dark at night.
Get yourself dressed properly and outfitted with the necessary equipment. This will greatly increase both your efficiency and enjoyment while spending a night photographing the aurora. Below are a few suggestions to help prepare you:

This happens to a usually flexible shutter release cord at minus 40 degrees below zero. © Hugh Rose
How to exposure properly.
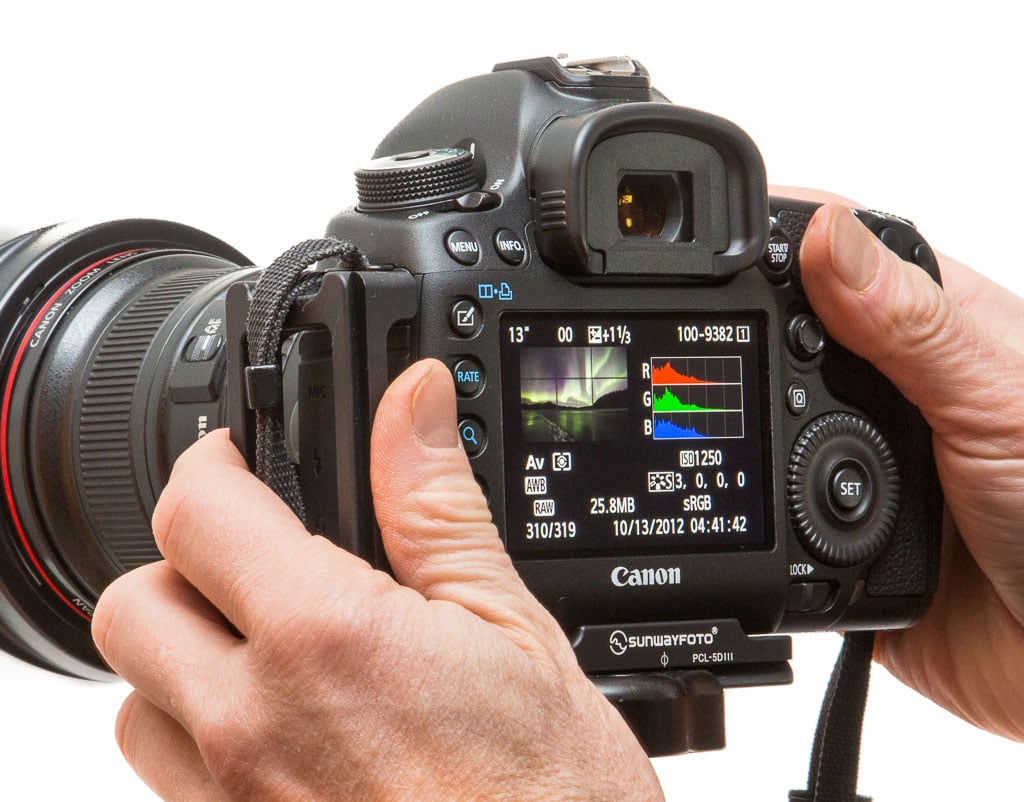
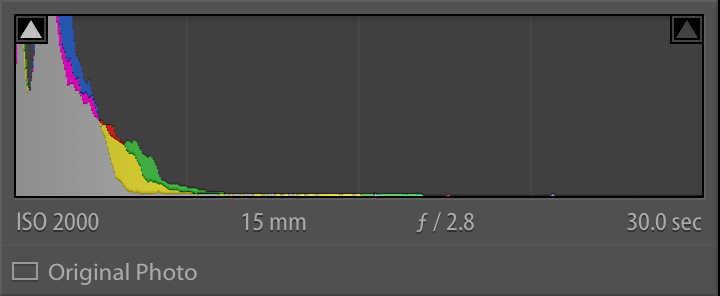
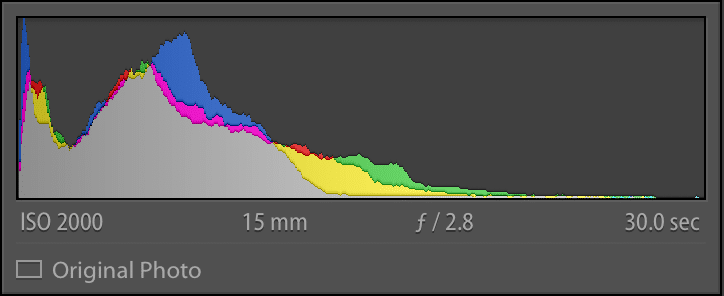
While the digital age has taken much of the exposure mystery out of aurora photography, it is imperative to be well-informed on a few particular aspects of digital photography to secure proper exposure. The histogram is perhaps the most helpful tool on your digital camera for getting adequate exposure. It is the graphical representation of the tonal values in your image. Camera LCD monitors can be deceiving during the dark, which is another reason your judgments on exposure should be based on your histogram and not the preview image you see. It is OK to consult that for composition, but learn to rely on your histogram. If you are not familiar with this, please see the article below.
Read your histogram: Do not be fooled by your camera’s LCD monitor. The preview may serve as a good reference, but a bright LCD monitor on a night can make things appear brighter than they are. Learn to read your histogram. I strongly suggest reading Understanding Histograms from www.luminous-landscape.com.
In the absolute sense, there is no right or wrong histogram since a histogram tells you the information about what is in a picture. It is your job to make the histogram reflect the scene you want. Because the aurora has brightness, you want to ensure your histogram shows that. The left side of the histogram represents pure black, and the right side represents pure white. Obviously, on a dark night, you can expect more darks in your histogram, but if the aurora is present, you should also see some values reaching into the mid-tones, as reflected in the second example.
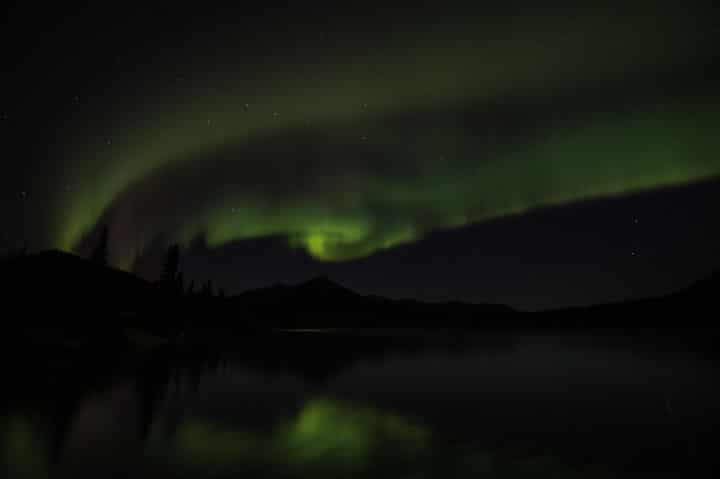
Underexposed
Underexposed as indicated by no brightness in the mid-tones.
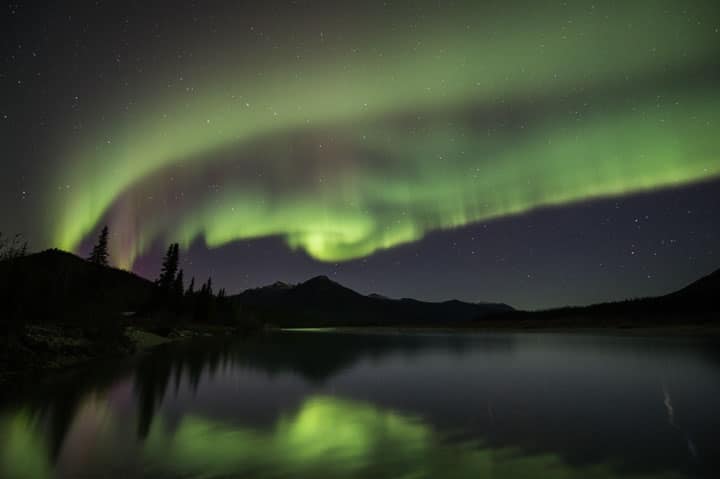
Exposed properly
It properly reveals some mid-tone brightness.
Proper Exposure is critical: Even though a RAW file offers latitude for exposure compensation, accurate exposure is imperative, especially when shooting high ISO.
Shoot in RAW format: If you are uncomfortable with RAW, shoot in RAW&JPEG format (if your camera permits it). Even if you don’t know how to process a RAW file, don’t worry. Someday you will be glad you did. Consider the RAW file like a negative. It will always be there, and you can process it anytime.
Generally, on a dark night, I would recommend starting with an exposure of 15 seconds at f/2.8, ISO 1600, and seeing how your histogram looks. Make adjustments based on that first test exposure.
The exact (and correct) exposure values will vary based on the brightness of the moon (or another ambient light present) and the brightness of the aurora. Correcting your exposure is not difficult if you understand how to read a histogram. Especially since you can make adjustments as necessary based on what your histogram tells you.
You can tweak the exposure by adjusting ISO, Shutter, or f/stop based on your lens and camera’s ability to utilize high ISO. High ISO tends to result in grainier images, which will significantly depend on your camera. Reducing time allows you to capture more definition in the moving northern lights. The chart below shows the benefit of an f/1.4 aperture if you want a short exposure time.
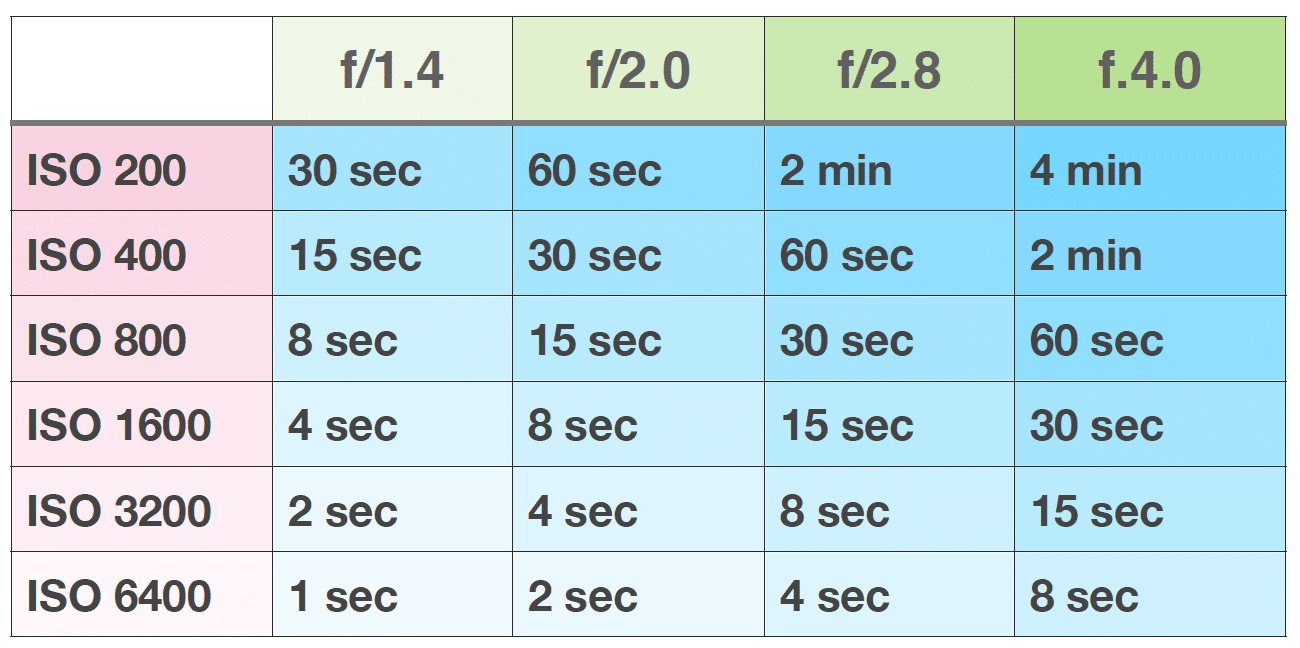
Chart of the relationship between f/stop, shutter speed, and ISO.
Many digital cameras have two in-camera settings that can control noise in a digital file.
High ISO Noise Reduction: This applies to JPEG only. If you are shooting in RAW format, you can ignore this in-camera setting since the noise reduction occurs in the postproduction process.
Long Exposure Noise Reduction: Turn this setting on unless you have tested your camera beforehand with it turned off and are satisfied with the image quality. The pictures should be free of hot pixels caused by a heated sensor. With long exposure noise reduction (LENR) turned on or set to auto, all long exposures (over 1 second on the Canon 5D Mark III) are followed by a second additional frame with the shutter closed. The in-camera software compares the two frames, subtracts the noise, and saves that image. It may slow the LCD preview process, but you can keep shooting.
An excerpt from Canon’s website:
“Some users wonder why this noise reduction feature isn’t always ON at all times. The answer is that using it can slow down your shooting of one picture after another. Here’s why: to do its job, Long Exposure Noise Reduction has to re-energize your imaging sensor and in effect take a “blank” exposure, after your actual picture is taken, for the same length of time. During this time, you cannot shoot another actual picture — the red card busy light on the back of the camera stays on until the process is completed. If you shoot, for example, a 30 second exposure, the camera has to be tied-up for an additional 30 full seconds before your next picture can be taken.”
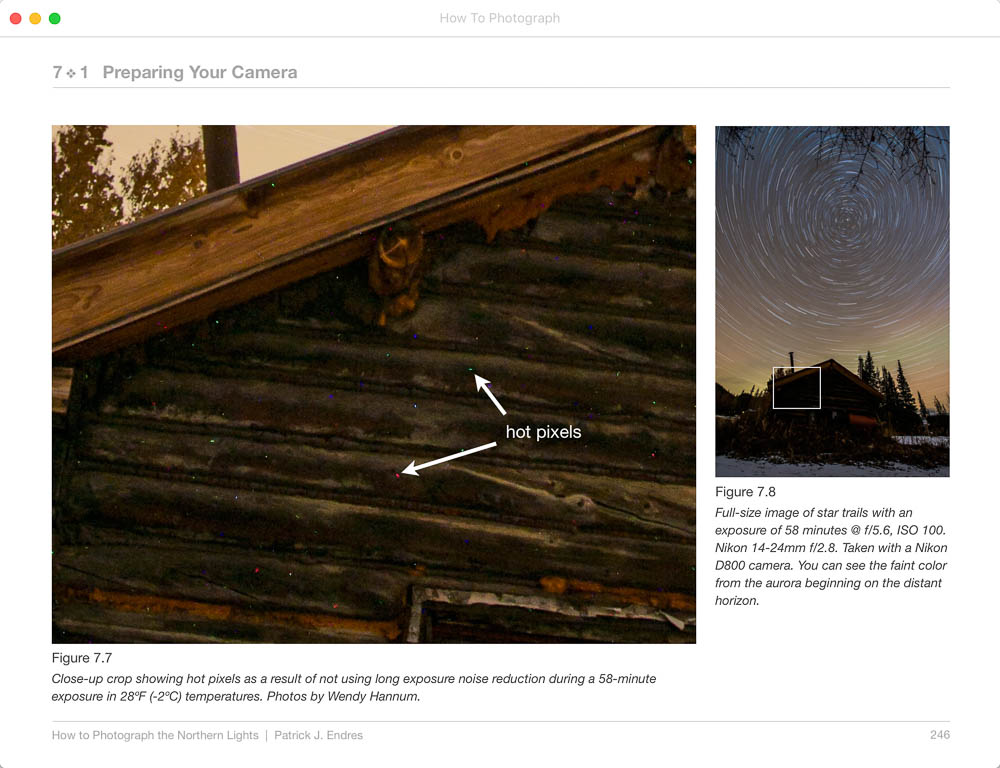
Hot pixels are noted for not using LENR on a 58-minute exposure at 28 degrees F.
There are several programs for making modifications and corrections to raw files:
Google Picasa (free)
Adobe Lightroom (my preferred choice)
Photoshop
In these programs, you will find the tools to address white balance, color saturation and tonality, noise reduction, shadow and highlight control, etc. The question of shooting a raw file over a .jpeg file will be answered immediately!
This subject is addressed in my eBook, with illustrations about what a histogram should look like and other exposure-related details.
What camera to choose and some of the factors influencing your choice.
There are many camera options out there spanning a vast price range, which can be confusing. I photograph with Canon cameras, and the 5D Mark IV is an outstanding, high-ISO-performing camera. Canon’s other digital SLRs and Mirrorless cameras are excellent options as well. Nikon and Sony have a strong lineup, sporting some of the best dynamic ranges currently available.
But all the professional and many semi-pro cameras deliver excellent results; you can’t go wrong with many of them. They all have their nuances, lens selection, and functional differences. It will come down to preference. For example, many photographers love the Sony A7RII mirrorless camera. I wouldn’t say I liked it, especially in the cold—just personal preference. I dedicate an entire chapter to this in my eBook, discussing DSLRs, full-frame and cropped sensors, Mirrorless Cameras, and Micro four-thirds models.
Good performance at high ISO
Has a port for a remote shutter release
The larger the sensor, the better the quality
Can shoot in RAW mode or RAW/JPEG
Battery functions well in the cold
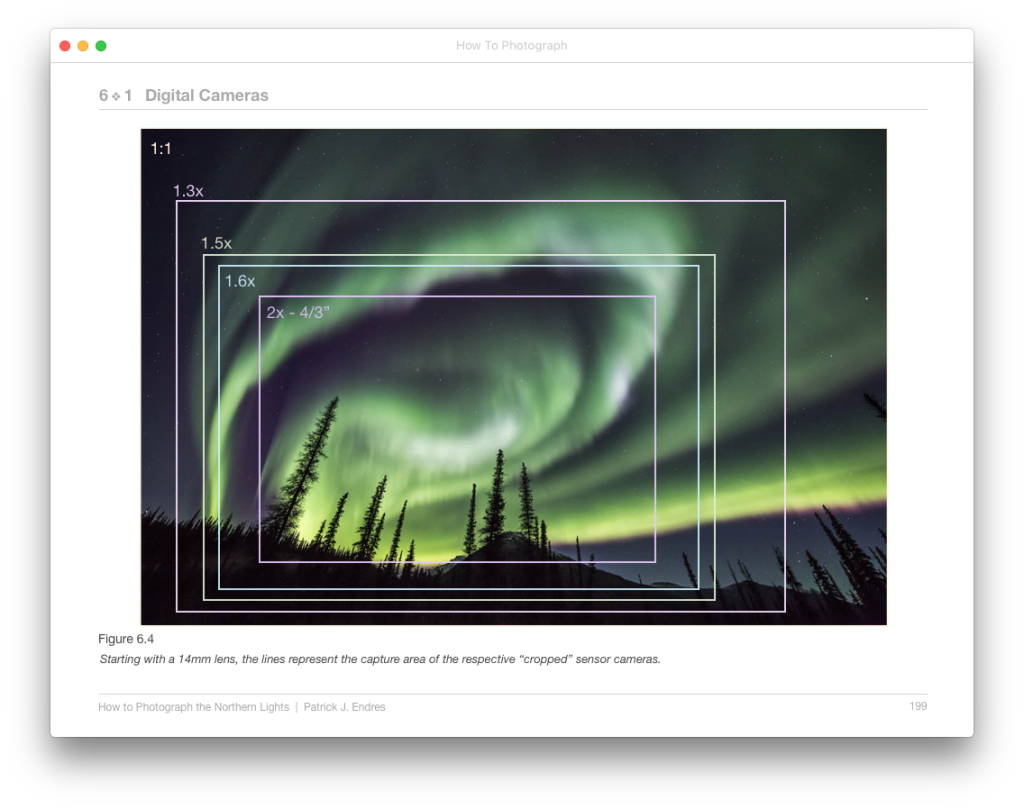
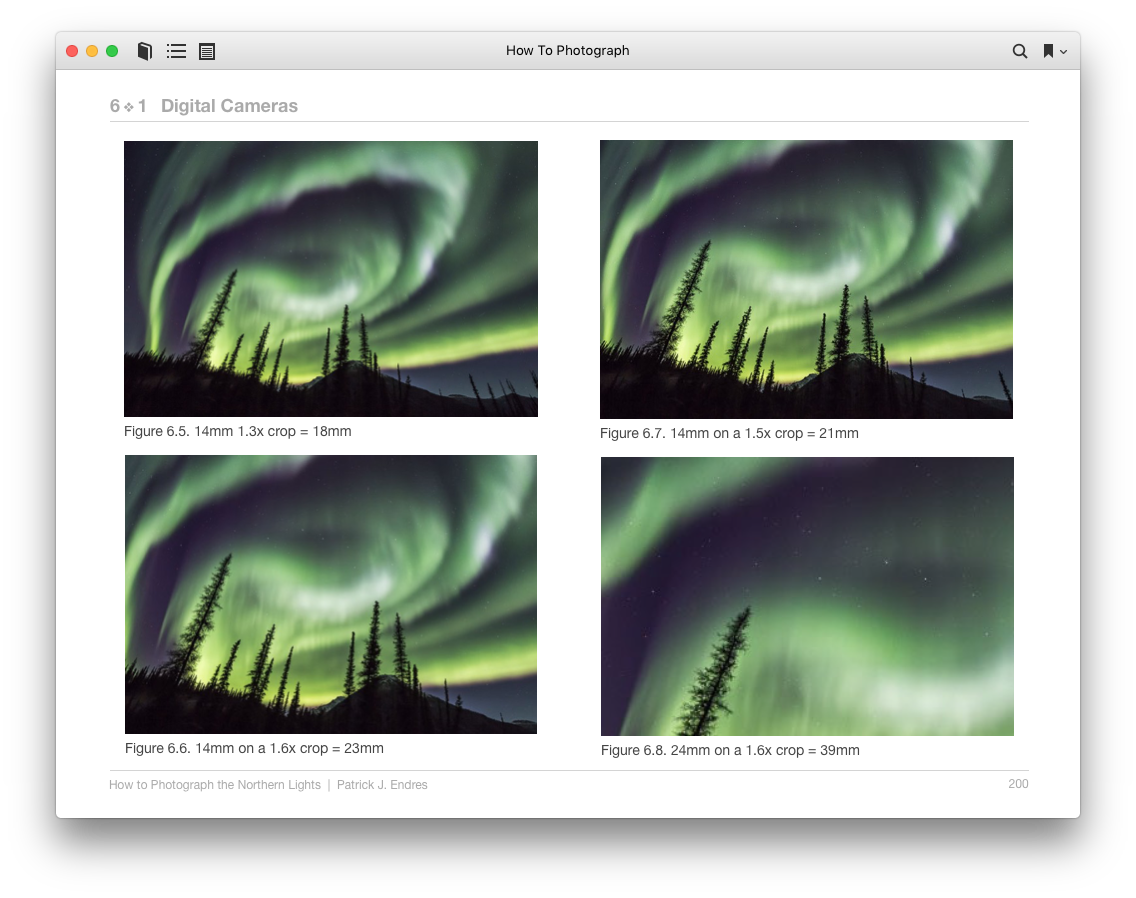
When choosing a camera, one of the most important considerations is the size of the sensor. Using a lens made for a 1:1 sensor (or FX full-frame) camera on a camera with a smaller sensor will result in a crop to the image. Some lenses are made specifically for the smaller sensor cameras but often have smaller apertures (greater than f/2.8) for the wide-angle versions.
See the illustration below for examples of what happens when a lens for a full-frame sensor camera is used on a camera with a smaller sensor. This illustrates the advantage of using a wide focal length lens.
If you are shooting .JPG files (which you don’t want to do), you will want both Long Exposure and High ISO Noise Reduction turned on.
If you are shooting RAW, you only need Long Exposure Noise Reduction turned on (This can be turned off in the Canon 5D III model and some other cameras as well).
There is some debate on the need for Long Exposure Noise Reduction due to the cold temperatures in which aurora photography occurs. Since noise is a function of a heated sensor, cold temps can prevent the heated sensor. I advise you to test your camera first, should you turn this setting off.
While it is not impossible to photograph the aurora with a little point-and-shoot digital camera (or your phone’s camera), it is challenging. I don’t recommend it if your goal is to reproduce images as pints. The models are constantly changing, and perhaps it will become easier.
There are several desirable qualities to look for when considering lenses for aurora photography; as a general rule of thumb, you want as many of the following:
Wide angle
Fast (large aperture of F/2.8 or wider)
Sharp
Minimal vignetting
Inexpensive
I have not discovered the perfect lens, but two general ultra-wide-angle zooms work well. Other lens manufacturers, like Tamron, Tokina, Zeiss, etc., offer mount lenses available to fit Nikon, Canon, Sony, and other cameras, and they have some outstanding options. I discuss this more thoroughly in my eBook:
Canon 16-35mm F/2.8 USM Good optical performer, but not exceptionally fast. A bit expensive but versatile for aurora and excellent for general daytime landscapes.
Nikon 14-24mm F/2.8 G ED Excellent quality, autofocus lens but loses that function when used on a Canon with a converter.
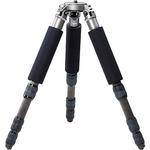 A tripod is essential for aurora photography. A tall tripod will be more comfortable as you aim the camera toward the sky. Squatting under a short tripod while cranking your neck can quickly become uncomfortable. (NOTE: A good ballhead and tripod are essential. On photo tours, I see many frustrated people whose small tripods and flimsy ballhead break or operate so poorly that they miss many photo opportunities. A good tripod is worth it.)[
The Manfrotto MT055XPRO3 tripod, although on the shorter side, is a good inexpensive tripod. It even has built-in leg pads to protect your hands from cold metal.
The series of tripods by Really Right Stuff are exceptional and expensive tripods. They are lightweight and made of sturdy carbon fiber.
Ballheads are preferred over pan/tilt heads. Kirk Enterprises makes the BH-3; it is a great smaller ballhead. Really Right Stuff also has some excellent ballheads.
Foam pads on your tripod legs will help keep your hands warmer.
If you get a tripod with a center column, the ability to remove it can be advantageous for close-up photography. Additionally, one should not rely on expanding the center column completely for aurora photography since this makes the camera less stable and susceptible to wind movement during long exposures.
Shutter Release: Prevents camera shake and allows for exposures over 30 seconds. (Some wireless remotes only offer exposure options of 30 seconds. Make sure to check the version you have if you plan on using a wireless remote)
Batteries: Have a few batteries at your disposal. Keep them warm in a parka pocket.
Chemical Hand warmers: I use them all the time. They can be kept inside an over-mitt or in your coat pocket for quick hand-warming.
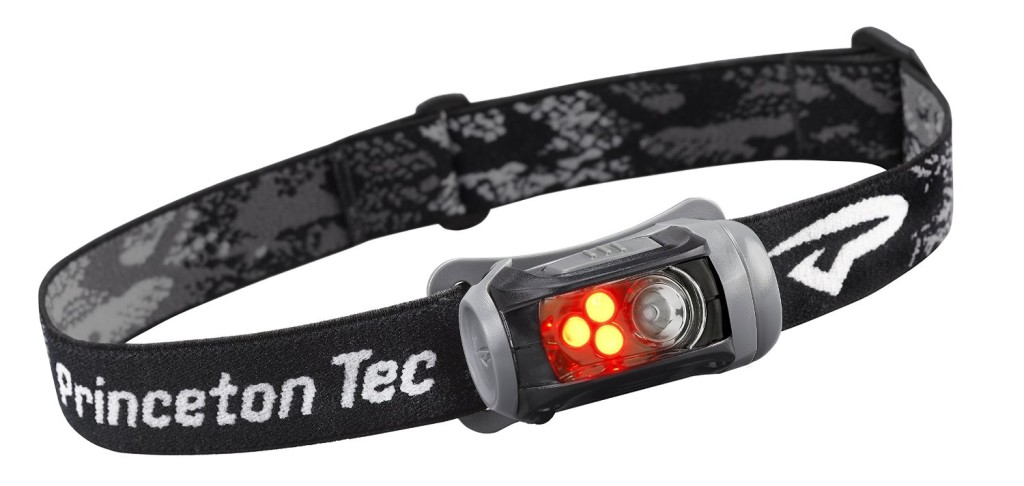
Headlamp:
A headlamp allows the use of both hands while handling your camera. Consider the on-off switch before purchasing since you will operate the headlamp with gloves. The Princeton Tec Remix Headlamp is a good choice.
Properly setting up your camera and lens is essential for successful aurora photography.
Setting up your camera and lens is essential for successful northern lights photography. Let’s review a few of the basic steps. There is a large variation in camera models; therefore, some specific settings may vary slightly depending on your model. If there is a significant variation in the intensity of the auroral displays, and you have a fast lens, you can shoot in Aperture Priority mode; otherwise, Bulb or Manual mode is best. I shoot in both Aperture and Manual modes depending on the circumstances and lens choice. As you get familiar with judging the intensity of the aurora, you can make accurate estimates of exposure times, should the brightness of the aurora change in considerable amounts-which is often the case throughout the night.
Set your camera to Aperture Priority mode (or manual) if exposure is under 30 seconds. If exposure is over 30 seconds, switch to Bulb.
Set your lens f/stop at its largest opening (f/2.8 or larger)
In Aperture Priority mode, a slight overexposure tends to be helpful, perhaps +1 to +1-1/2 of a stop. (This varies greatly depending on your camera model. It can be up to four stops on some camera models. Experiment and review your histogram.)
Using Bulb mode: If your exposure exceeds the in-camera timer of 30 seconds, switch your camera to Bulb mode. Plugin your shutter release (some cameras have built-in intervalometers). Your exposure will continue as long as you hold the release button down. Be aware of the helpful clock that counts in seconds on the camera’s top LCD panel.

Filters on a lens can cause concentric rings to appear in the center of an image (this is a crop). Be sure to remove the filter when photographing the aurora.
TAKE OFF YOUR LENS FILTER!!
When photographing the aurora, removing the filter from your lens is essential. Why? Look at the photo to the right, and you will see a series of concentric rings at the center of the image. This can be a disheartening discovery after a night of shooting the aurora since the rings are very difficult to remove, with even the best Photoshop geek on the job. What causes the rings? Charles Deehr, a professor emeritus in physics at the University of Alaska Geophysical Institute, says:
“These are interference fringes due to the parallel faces of the filter and to the narrow spectral emission at 5577 Angstroms in the aurora. That green, atomic oxygen emission line is the strongest emission in the aurora near our film and eye peak sensitivity, so it shows up first when there is any device in the optical path which sorts out the spectral emissions.
Pre-focusing your lens: Don’t overlook this critical step. I have found this to be the biggest problem with photographing the aurora. With the new genre of autofocus cameras and lenses, a tolerance is built into the lenses to accommodate temperature changes. For this reason, you can’t manually turn the focus dial to infinity and be confident it will be in focus. The old manual lenses worked this way, but the new ones don’t. (A few manual focus lenses still work this way, like the Zeiss 21mm f/2.8, but even those should be checked to ensure.)
Because of this, there are two ways to focus your lens. In my experience, pre-focusing by using autofocus during the day has worked well for most lenses except for the wide f/1.4 lenses like the Canon and Rokinon 24mm 1.4L. For these lenses, it is necessary to use the live-view function (if your camera has it–most DSLRs have it). Achieving focus and using live view is discussed in depth in the full version—it can be more challenging than you might think.
Before it gets dark, focus your camera on a distant “infinity” focal point, like a mountain horizon.
Find a bright object in the sky (not the moon) and center your camera on it by looking through the viewfinder.
Turn on live view and maximum zoom in on the object and adjust until sharp.
Working in the field.
Finally—now that you have invested in a camera, lens, tripod, ball head, cold weather clothing, equipment, and most likely travel—it’s time to go into the field and try the actual shooting!
By now, you are well on your way to answering the question of “how to photograph the northern lights!”
Long exposures: Remember that long exposures chew up batteries quickly.
Keep them warm: When waiting for the aurora in extremely cold conditions, I remove the flashcard and battery and put them in my pocket. When the action happens, I quickly put them back in the camera and start shooting.
Although I have one with me, I rarely use a headlamp during the night. It may seem awkward initially, but night vision becomes well-adjusted after 10 or 15 minutes as your pupils dilate. You also need your headlamp less if you’re familiar with your camera’s features and buttons making it easier to operate in the dark. Practice, practice, practice!
When Using Your Headlamp:
Be sure it is on its dimmest setting.
Limit use to retain night vision. Use it as little as possible, and turn it off immediately. Night vision helps you see and compose more critically on a dark night.
Use a red filter/gel. This feature is standard with most headlamps.
Point it downward. This helps prevent your light from shining in your and other people’s photos.
Avoid looking directly at others when wearing it. They will like you for this!
Have a spare battery nearby.
Beware how much light pollution even a tiny headlamp with a red filter can contribute. Use it as little as possible and point it downward.
Before you begin your aurora photography adventure, here is a brief review and some final considerations.
Shoot in RAW format
Set LCD Brightness to low
Remove the filter from your lens
Pre-focus your lens on infinity or use live-view with loupe
Test exposure, consult histogram
Test exposure, consult histogram
Test exposure, consult histogram
Have 2 batteries and 2 flash cards
Use a tall, but sturdy tripod
Check the aurora forecasts
Use your lens hood to protect against frost/condensation on your lens
Put black tape over your red processing light under the wheel (for Canon users-your fellow photographers will like you)
Finally, good luck, and have fun! Getting yourself in the right spot with clear skies, good aurora activity, and smooth working gear can take a few attempts.
Put in the time. Persistence pays off.
Don’t give up early.
Enjoy the wonders of the night sky.
Don’t give up early.
When in the dark, wear something with reflective material.
Stay alert and walk carefully in the dark. Snow and ice can be slippery.
Don’t drive when sleep-deprived.
Be considerate of your fellow photographers. Practice good light-pollution-free etiquette.
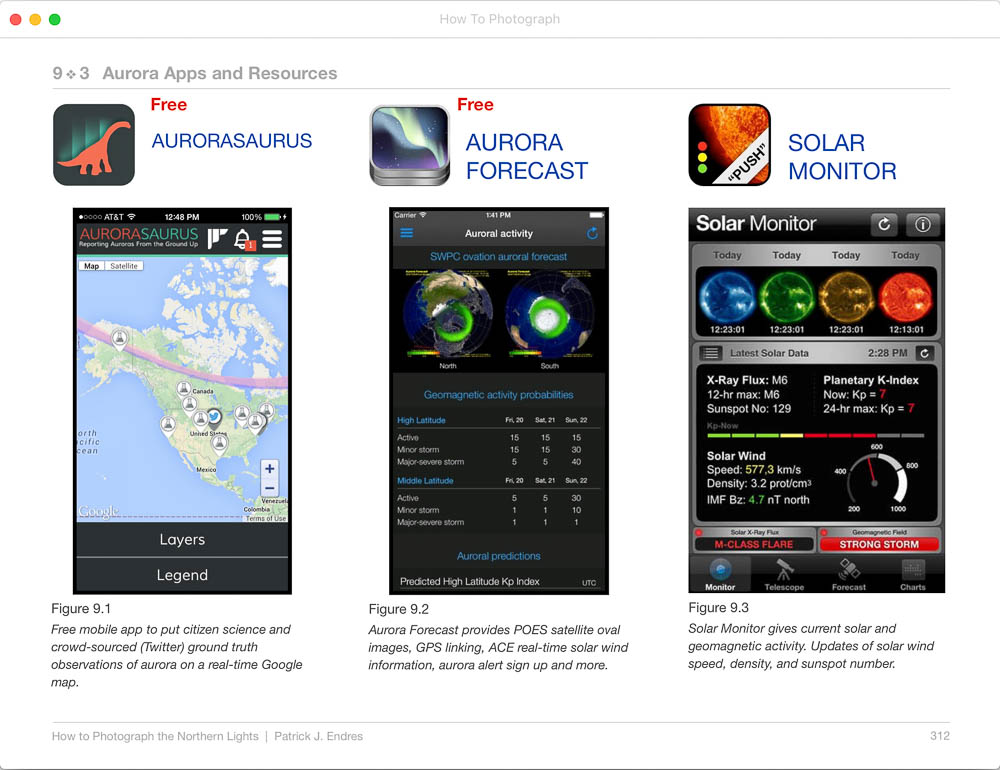
Various apps are valuable resources.
Well, there you have it! You should have enough information to be on your way to photographing the northern lights. Believe it or not, there is much more to discuss on this subject, and I’m sure you did not think I’d let you get this far without making one last plug for my eBook.
There is material in the ebook for both the beginner and the professional. If you are serious about photographing the northern lights or investing in a trip to do so, I strongly suggest you get the full version eBook. I know; it sounds like a cheesy book pimp since I’m the author. But, based on my experience, after guiding aurora photography tours for two decades and seeing many common mistakes—not to mention making many of my own—the cost is a trifle in the big picture of an aurora photography excursion. Even now, when guiding aurora trips, I have all the guests read the eBook before the trip, which significantly affects the outcome of their photos. Of course, having a guide is a great asset, but even they assure you that the more you practice ahead of time and the more information you have, the happier you will be with the results.
There is a considerable investment in time and money to get yourself well-positioned to photograph the aurora. That investment is too significant to sacrifice to the misfortune of being unprepared. I only wish there had been a resource like this when I started; I would have thrown away fewer pictures!
Read a full review of “How to Photograph the Northern Lights“
 Buy downloadable PDF
Please link back to this page when sharing. Thank you ~ Patrick
“If you dream about chasing the Northern Lights, buy Patrick J. Endres’ book because it will strengthen your resolve and encourage that dream. If you plan to try to see them, this book is an essential read. As we would expect from Patrick, it is magnificently illustrated with thought-provoking quotations, but it is much more than a pretty ebook. This is a substantial and authoritative work, with contributions on the science of the aurora borealis from Neal Brown. Yet it is a compelling and enjoyable read and extremely well laid out. You will learn where, when, and even what time to photograph the Northern Lights, how to prepare, what to wear, how to capture them on camera, and much more. This is the book to read on the Northern Lights.”
Cecily O’Toole
“This book is the authority on photographing the aurora. Beginning photographers to seasoned pros will learn valuable tips from Patrick’s vast experience photographing Aurora in the far north. Patrick explains photographing the aurora and shares valuable information on predicting displays, dealing with the cold, and composition guidelines. All this is illustrated with stunning Aurora Borealis images.”
Tom Bol, Professional Photographer
“I just wanted to take a moment to say Thank You for writing your book, “How to Photograph the Northern Lights.” It had been a dream of mine not only to see but to photograph the Northern Lights since I saw a photo of them as a teenager… 40 years later, it happened. I just returned from a trip to Fairbanks, and I read your book many times before leaving and then practiced everything I read before my trip. Your book prepared me for everything from the weather to ensure I had the right camera, lens, and settings, and how to use the Aurora Forecast data. Your book was my bible and made my dream a complete success. So, Thank You for making my dream a reality!”
Thank you and Best wishes, Kyle Moore
“I’m pretty sure you’ll not remember, but I got in touch two years ago after buying your first edition, and you were kind enough to point me in the right direction for a handful of locations in and around Fairbanks to shoot the lights… Thank you for inspiring, teaching, and, most of all, for being passionate about the aurora. I can completely understand where the passion comes from, speak non-stop about it to anyone who will ask, and I am currently looking for a way to head north for at least a month next time ;). It takes a good teacher to share your skills and understanding of photography and the aurora, and sharing it so openly is a credit to you.”
Thank you Patrick, Kind regards, Neil
This site uses Akismet to reduce spam. Learn how your comment data is processed.
Your cart is currently empty!
Notifications
Thank you so much for writing down this information! I bought my first DSLR (Canon Rebel XTi) last spring and have been hooked on photography since then. I recently bought a Tamron 18-270 lens (to replace my “entry level” Canon EF 18-55 and 75-300 lenses). Two weeks ago I managed to get a few good shots of the northern lights from here in ANC. This weekend I will be in Talkeetna and the forecast looks excellent, I am hoping to get some better shots.
I have shot in RAW a few times, and I think I need to better understand my editing software before I can really utilize all of it’s capabilities, but the information in your blog makes me want to use RAW more often.
My camera’s ISO only goes up to 1600, and the f-stop on my new lens stops at 3.5 – do you have any suggestions for how I can get the best images of the northern lights (given these constraints?)
Thanks for your help and information!! -Eric
Great Article!
How do you usually set your white balance ?
Thanks!
Eric,
You’re welcome. Definitely shoot in RAW or RAW/JPEG if the camera permits. I have not tested that Rebel, so I can’t comment on image quality. Do a little experimenting. Long exposures are o.k. if the aurora is not moving too quickly, you can then bring your ISO down a bit. You may find acceptable results even at 1600 ISO.
Brian,
If you shoot in RAW, it does not matter much what your white balance is since that is all tweaked in post production. However, auto white balance is what I use and makes a pretty good starting point. Some slight cooling is often necessary, but it depends on aurora color, intensity, moonlight, etc.
Thanks for the help. I’m currently on the north slope and hope to try and get some pics of the aurora. I’m using a cannon t1a slr with 15-55 and 55-250 lenses..It’s the first “real”camera I’ve ever had and I’m completely overwhelmed by all its capabilities. I’ll be refering back to your site I’m sure for more hints and ideas… Thanks!
~Nick
Nic,
You are welcome. I will continue to update this article, so check back. Good luck up there, the daylight must be rushing in on you by now.
Very helpful advice, now I only have to hope to see the lights. will be in northern Norway in two weeks. I have a Panasonic Lumix DMC FZ50 and although it’s not an SLR takes great night shots. So here’s hoping.
IT WORKED!!…Had a great show of the Aurora last night and managed to get some great images (at least to me).. Hope to experiment some more before the 24 hour daylight takes over.. Thanks again for your help..Best of Luck to Everyone.~Peace
Fantastic Nick,
Glad to hear of your successful sky and camera connection. Keep on shooting…
Robin,
Good luck, share your results.
thanks for the article its really informative and helpful – i have just got my first camera; a Fuji fine pix HS10 super zoom, in order to go to Iceland next week, and heres hoping see the aurora Borealis thanks again for your tips 🙂
HI
Wow! I found your website amazing. The photo’s were wonderful to look at and my dream is to one day come and see the Northern Lights myself. I am even more determind since seeing your pictures. I also found all your additional information very interesting and very helpful. We are very lucky that we have people like you that can capture such wonders of our world.
Thank you
Maria
wow..what a complete information….thanks a lot..i am surfing the internet for my next trip to see aurora and here iam, got it all..
Thanks Jake, Maria and Martha, I’m glad you found the article helpful. Good luck with your shooting.
Thanks for posting this great guide! We will be in Iceland this weekend–probably too late for the aurora but it doesn’t hurt to be prepared during those very short dark hours that are left. I’ll be sure to share any results if we happen to get any!
Good luck Andrea!
Thanks much for a great article! Been shooting distant Northern Lights right here in Green Bay, Wisconsin. Lots of fun but having them low on the horizon at great distance does not make it easy (or dramatic).
Shawn, You are welcome, and I’m sure it is a challenge shooting aurora that far south!
Link back- thanks for helping the tourists understand how to capture the Lights before they come up.
You are welcome!
Our family is making a trip up to Fairbanks this year at the end of September / early October just for the Aurora. Can’t wait! Your site IS the best I’ve seen to help us get ready and for our photography time. Want to join us for a night? Thanks! – Rick
Thank you, Patrick, for a most thorough article. My husband and I are coming to Fairbanks in order to see/photograph the Aurora, so I’m beginning to think I would not have had a ghost of a chance if I hadn’t come across your very helpful instructions.
Are there any particular sites for the photographs in Fairbanks that you could recommend?
Libby,
The main thing about shooting near Fairbanks is getting away from the city light pollution. So I would recommend locations along the Chena Hot Springs road, or the Steese or Elliot highways. One need not drive far from town to the north or east to get away from the city lights.
Thank you for the article, it is very usefull. I also could add using Noise Ninja for noise reduction. It works very well and you can skip long exposure noise reduction and save time.
Hi Patrick
Do you have any experience with Canon 17-40mm F4? This is the lens I have been using for auroras but stars are not good at the corners at 17mm F4. I wonder if my lense needs repair or it is the way this lense is
Thank you
Rodrigo
Rodrigo,
I have not used the 17-40 for aurora photography. I can tell you however, that all lenses that I have used, including non-zoom primes, at wide open apertures, all degrade in quality at the corners. This is exhibited in loss of sharpness but specifically in what I call flying birds (although there is surely a technical name that I’ve forgotten) which is the stretching of the stars. It appears as though they have wings. Unfortunately, it is something to contend with.
Hi Patrick
Thank you for the information. I guess, I will live with that :). The aurora pics come very nice in general with this lense (even here at Green Bay, WI). The color correction for the lens is very good too, the only think I wish is if the lense would be a bit faster.
Best regards,
Rodrigo
We are looking at making the drive from S Florida to Fairbanks this summer while pulling a cargo trailer. I would like to see the lights at Fairbanks.
Any suggestions on how to make this long drive memorable with my photography passion ?
That’s a long haul from Florida, it should be a fantastic trip. In the best scenario, you would not see the northern lights until about late August to early September because of daylight. Keep that in mind.
Thank you!!Looking forward to your better and better articles.
Hi… Thank you for an excellent article re photographing the Northern Lights.
I live in a very remote part of Scotland about 30 miles south of Aberdeen and what I lack in Camera equipment I think will be partially offset by the location. The position I have in mind is just 100 yards from my house and I can park the car right where my tripod will be standing. There will be no street lights and I will be in the total dark with a clear view of the sky from NE to SW.
I own a Cannon EOS 500d and various lenses but the one that I will be using will be my Tamron 18 – 270 f3.5. I also have a wireless remote that works with the bulb setting.
My location here might not give the spectacular results that you get in Alaska but I hope and believe that I will get some reasonable pictures. I will follow your suggestions to the word and look forward to some decent photos from the depths of Northern Scotland 🙂
Given the equipment that I have if you have any other suggestions I would love to know what they might be but I respect that you are a busy person and cannot reply to many e-mails.
Once again, Thank You for a very helpful article.
Cheers
Nigel Final.
Nigel,
Given the equipment you have, which should be sufficient, be aware that your exposures will be a little longer when shooting at f/3.5. For that reason, you want the flexibility of having a longer exposure than 30 seconds, which if I remember correctly, is the limit of the wireless remote. (are you sure it works in bulb mode? – if it does, your set, but I’m skeptical) If it does not exceed a 30 second exposure, get a remote that connects directly to the camera. Other than that, experiment and have fun.
Hi Patrick,
This is an excellent write up. Thank you so much for sharing your knowledge.
-Jay
Jay, you are very welcome
Patrick, thank you again for your wonderful tips on photographing the Aurora. My husband and I will leave for Fairbanks in another week. My worry is the storage of my photographs. I shoot in RAW – big files – and I am very worried about losing another external hard drive (I left one on the train once, and another got erased by accident! AACCKK!!). I would like to try one of the “clouds” but it looks as if these places turn your photos into jpegs. I tried to upload ONE photo to Dropbox and it took 8 minutes. Since I will have thousands maybe this won’t work. Do you use one of these services?
Thank you!
LIbby,
There are many cloud services available. I use the one associated with my website, which offers 1TB of storage with the monthly pro account fee. I’m not familiar specifically with other cloud storage options, but I know there are many out there. A thorough google search should return some good options.
Patrick,
Thanks again for the site i referance it just about everyday just to see if there is any new tips or tricks… but i got a question for you; i just got a f2.8 15mm fish-eye and i was wondering what your take would be on this. i shoot with a rebel t2i and this is the first wide angle lens that i own. if there is any other lens that i should get and/or how to use it would be much appriceated. thanks again for your time.
-Paige
Robert,
The 15mm 2.8 should be a fun lens. Be careful of distortion, which can work for you or against you depending on what you seek to portray. Using one lens for a bit is a great way to start. Once you have a handle on how that produces you can explore other lenses that are fast and wide.
Hi Patrick and all who follow this great site / blog – Our family just came back from a week+ trip into and around Fairbanks. We went specifically to see the aurora and studied Patrick’s advice religiously before we started our trip. Like many before us I’m back to report the advice was priceless!!! We felt very prepared, came back with tons of great photos (we got very luck with clear nights and two level 4 aurora alert nights) and lots of great memories. We did plan our trip properly too around a new moon, solar rotation, dark skies and historically active months but the advise on cold weather gear, camera equipment and locations was excellent. Can’t thank Patrick enough for all his experience, advice and (more than anything else) his willingness to share all this. We shot with a 17mm and a 15mm at 2.8 on a canon 5d and an astro-modified canon 50d. Stopped by UAF to get advice on viewing locations (they recommended the parking area near Skiland) and we found milepost 52 on the Elliot Hwy great and easily accessible. Anyway, THANKS for everything!, – Rick
Rick, you are most welcome. I’m delighted you found the information helpful and your efforts productive.
Hi
Firstly, I love your photographs, and I wish I could intern with you, do you by any chance take interns?…Anyway, I am from India and I am coming to LA to see my brother this december. We were planning to visit Alaska, but I’m afraid that’s not a very good season especially if you wanna see the aurorae(as per the stats)..pls suggest what I should do I really wanna visit Alaska once and after this it might be really impossible for me…Also the thought of extremely cold temps is a bit scary..but I can manage, ‘coz the will power right now is a little too pushy…
Achal,
Thanks for you comments. If you want to see the aurora, come to Alaska in late August early to mid-September. It is still warm, but just beginning to get dark enough at night to see the aurora. Good luck.
Hi Patrick
Thank you again for all the useful tips about northern lights photography. You pictures are fantastic. I just have a question. What is your criteria for photo enhancement. I usually improve my pictures by slightly touching highlights and shadows (so I can see more details of the aurora), contras and saturation as well as applying noise reduction and sharpening. Sometimes, I also improve exposure when I overexpose or underexpose the pic a bit. Do you think it is valid? or pictures should not be changed at all? I never change hues or colors.
Thank you so much
Rodrigo,
My basic workflow in grading a RAW file taken of the aurora consists of tweaking many of the attributes, which include temperature, tint, exposure, brightness, contrast, vibrance, noise reduction, etc., By nature of a RAW file, it has not particular profile attached to it, like in the days of shooting specific film types, so its up to you to render it in the fashion you find most appropriate. As for what that is… it depends on the person. Aurora captured on a camera rarely looks like the eye saw it anyway, since you are dealing with a timed exposure, and a digital sensor that is able to capture colors that it is hard to see with the human eye. I try not to change the scene much from what the camera captured, in terms of color or saturation, but I do work on them heavily in LR to make tonality and contrast appropriate.
Patrick,
Thank you so much for the information. By the way, I just bought a new lens. It is the Rokinon 14 mm, F2.8, fully manual. So far I tested it during the last red aurora display and the lens outperformed my canon 17-40mm F4, at the corners and color. Have you ever used this lens?
Rodrigo,
I have never used that lens, perhaps you could email me a hi res version of a photo taken with it. I’d like to see what it looks like.
Hi Patrick
Sure, I already sent it. Let me know when you see it
Thank you
Hi! I Williams g to scotland tris december i would like to know if i can see some northern lights in there. Kyle of tontis is the name if one city in northern scotland can you help me with this?
Ireri,
I’m not sure about in aurora in that region, try a google search on that.
Hi Patrick, first of all thank’s a lot for this amazing article !
So full of information! I’ve got a question about the temperature..
In such cold temperatures, isn’t there any chance to have my camera (Canon 60D) inactive ? Do I need a kind of sealed case or do you think it will make it just like that with the tape on the lens to block the focus ?
Same question with Canon 550D please 🙂
thx
Maxime, Most cameras do quite well in the cold, save for the batteries. You should be fine without any special case.
I can’t thank you enough for posting this tips. I might have the opportunity to spend a few nights in northern Finland this winter and I would love to make the most of the time! Not only was the content valuable, your present it well!
Hi Patrick, I have found this second hand camera, do you think it will do the job Olympus 5060 wide zoom?
Or if you have any shop that I can search in.
Many thanks
George
Malta
Patrick
This is one of the best sights i have read on photographing northern lights!
We will be heading to tromso in february. One option is to rent a tripod from tour company for my nikon3100. Or i can buy a tripod. However i dont want to spend a lot of money since i wont be using it very often. Weight is critical since all my photography involves travel. But i also want it to somewhat stable in snow(at least forb2 days i will be in norway). And my longest lens is 70-200 but the tripod is likely to be used with smaller lens,.
Your sugestions above are quite expensive for expected use. Do you have any other recommendations based on your guests’ experiences?
Many thanks
Kerry
Hi Kerry,
If you don’t plan to use the tripod much, then I would agree my recommendations are expensive. However, for decent aurora photography, a good tripod makes a lot of difference. I would check into renting one, although I don’t have any rental recommendations. You might inquire at http://www.lensrentals.com
@patrick. thanks for the advice on the tripod. i have a question regarding best lens. i am using Nikon 3100 and have a 18-55mm f3.5. it would appear that i will need to have a much longer exposure at 3.5. however, there are a few lens rental options available:
24mm 1.4 (most expensive); 20mm 2.8; 17-35 zoom 2.8. in terms of price/value trade off, which would be best option: zoom or fixed focal length (ie does zoom give me a bit more flexibility?); or should i just bite the bullet and rent the lens with the lowest possible aperture?
Kerry,
I would advise the 16-35mm or the 17-35mm f/2.8 lenses. They are versatile for other work, and are wide enough for a aurora. The 24mm 1.4 is a fast lens, but very difficult to achieve critical focus. Good luck.
Hi Patrick
Great article, I was wondering if I could pick your brains a bit more?! I am going to Sweden next week and was hoping to photograph the northern lights. I have a canon 60d and a sigma 10-20mm ex lens. I have read that problems can arise with condensation forming on the camera and was wondering if you had any tips on preventing damage to camera or lens? I am staying in various cabins during my trip without electricity so will be taking several spare batteries to last!
Many thanks
Chris
Hi Chris,
While it is possible to have condensation problems, it is not really common if you follow a few basics. If you take your camera from a cold temp to a warm one, then condensation may arise. To mitigate that, put your camera in a photo bag, zip lock bag, or thick down coat when you go inside and let it come up to room temperature slowly. When you are outside, condensation won’t be a problem. FYI, in 20 years, I’ve never had a problem with it, and I just put my camera in a camera bag when going inside.
Good luck
Thanks for the advice Patrick, I leave tomorrow so I will let you know how it goes! Thanks again
Chris
Tons and tons of useful info. Thanks a bunch for take the time and effort to post this. Although I live in RI, which is not exactly north of anything except NYC, I do enjoy low light shooting and your tips and techniques certainly apply. Muchos gracias!
Jan Armor
Hi Patrick – what a great article, thanks for all the tips. I’m off to hopefully capture the Northern lights in a couple of weeks and am now exited that i might be able to get some images if i am lucky.
I have a Panasonic Lumix G3 camera with the standard lens 14-42mm f3.5 (35mm equivalent: 28-84mm) and am wondering if i would benefit from a any of the following three Lumix lenses that i am considering:
14mm pancake lens f2.5 (35mm equivalent: 28mm), but i’m not sure how much difference the slightly better f-stop will make in practice?
20mm pancake lens f1.7 (35mm equivalent: 40mm)
7-14mm f4.0 (35mm equivalent: 14-28mm)
I would really appreciate your feed back. Thanks in advance – Matt
Patrick,
I plan to be in Fairbanks and then in Coldfoot (perhaps there is a warning in that name!) in mid-March. I have a good, but heavy tripod. I know I should not admit this, but I rarely use the tripod, hand holding or using a rock or stump to steady the camera, because of the extra weight from lugging the tripod. I was wondering about using a monopod for shooting the aurora. Do you think that is feasible? Or is it crazy?
I add my thanks and praises for your blog to those of your other admirers.
Kind regards,
Alice
Hello,
Terrific info about the northernlight-photography. In the article you say no filter in front of the lens. Do you mean any filter?
Or can I use a pol filter?
Regards,
Jaas
Alice,
You need a tripod, a mono wont do it.
Jaas, do not use any filter when shooting the aurora.
hi,im going to Norway,end of feb,still not sure regarding filter’s can i still use a polariser?
many thanks Mark.
Mark,
Do not use any filter when photographing the aurora, you can use a polarizer for other daytime shooting however.
Patrick,
I also live in Fairbanks, (and own a Canon T1i with a few lenses). These are some great shooting tips! I have yet to capture the northern lights, I am currently deployed. However, when I return I will be purchasing my 4th lens and I think I will be ready to start shooting some great photos. I would love to be able to maybe correspond with you in reference to photography and what my goals are and get your opinions if that would be alright with you. I am so excited to get back home to my family and get back to continuing my portfolio.
Thank you
Mike
Mike,
Good luck on the aurora shooting. I travel often, but send me an email and I can try to respond to your questions.
Weather report says we may be able to see them in Massachusetts tonight. This is a great article. I also learned much about noise reduction that will serve me well in all my night photography. Thank you for sharing.
Thank you for all of the info. I live in Fort McMurray Alberta. I have been trying to catch the northern lights for 2 years. F stop and timing are my problems. Maybe tonight I will do it. I use a Pentax camera
I’m not much of a photographer yet, but the biggest noticeable missing lens on your list is the Nikon 14-24mm f/2.8. It’s not cheap, but well worth a rental and if I had time to find one that is what I would be using tonight. I promise that is probably the best lens made to given the nature of the goal.
Tom, that is an excellent lens and I did have it listed as an option. See lenses…
OK I brushed up on the advice. I read this before and it helped the time I was out for the Milky Way and the Aurora came out. But tonight I’m out hunting specifically for the lights. KTUU says tonight’s the night, from Barrow to Prince William’s. Wish us luck. And thanks.
Todd, I hope things worked out for you. Good luck.
Hello Patrick,
I am planning on going to Iceland in March to see the norther lights. I have a Canon 50D with the 17-85MM lens. I get the sense this isn’t the best lens for this type of work. Can you suggest a good lens, reasonably prices, that would work with my camera and be good for this type of shooting?
Thank you,
Tricia
I check the list of what kind of camera to shoot the aurora, Sony A55 isn’t on the list. I have been considering to buy a A55 for a long time, don’t Sony also work well for shooting the aurora? I am researching on Canon T2i, Sony A55, and Nikon D90, what’s better and worthy to get. Any tips?
Thank you.
Shauna,
I’m not familiar with Sony cameras. The Canon and Nikon would do fine, but the lens is important also. As stated, a lens of f/2.8 or faster is optimal.
AMAZING! You’ve shared so much information it will take me many trips back to absorb it all . . . and happy to do so.
If you’re ever in Northern CA I would LOVE to listen to a lecture and see a slideshow. My (college) digital photography class would jump at the chance to see your work and hear your experiences!
Thanks so much for generously sharing your photographs and knowledge.
Thanks Darris, good luck with your shooting. And thanks for the invite south.
Thanks for this great article. I would be very thankful if you could please answer my following queries:
1. I have an old Nikon D60 camera with 18-55 & 50mm1/1.8 lens. Which lens would be better suited to click Northern Lights?
2. How do i focus on infinity, if at all this is possible with d60 and above said lenses?
Thanks again!!
MP
MP,
I would not recommend the D60 for aurora due to poor performance at high ISO. The f/1.8 is a fast opening, but the focal length is too tight at 50mm x 1.5 on the d60, essentially 75mm. the 18-55 is wide enough, but is probably f/3.5 and therefore not fast enough with that camera. For the energy necessary to get aurora pictures, I would pursue a different combo if you are serious about. If you can’t, shoot the 18-55, use a remote cable, don’t go over 400 ISO, and get ready for 1-4 minute exposures.
Thanks a lot Eric!!
How do I focus on infinity using 18-55mm lens since it does not have infinity marking on it?
Thanks
MP
just a follow up question about lens selection. i have seen a couple of other questions regarding using the NIKKOR 2.8/14-24MM G-ED AF-S lens? is there a really big difference vs the 2.8/17-35mm lens given that the 14-24 is heavier and bulkier?
thanks
Kerry,
The obvious big difference is the focal length range, I do not own the lenses so I can’t comment on quality, but you can explore reviews on that. The other consideration, unclear to me, is the propensity for lens flare on the 12-24 if the moon is out, which has happened on other lenses with large, rounded front elements. I suggest you do thorough review of the lenses on line.
firstly congrats on the best website i have seen about photographing the northen lights.
i am going to laplandin march and hope to see and photograph the lights, i have been looking at lenses for my sony alpha A200, the ones i have found are the tamron 17-50mm fstop2.8 or the tonkina 11-16mm fstop2.8.. your advice would be greatly recived.
Thanks Emma,
I’m not familiar with either of those lenses or your camera. At f/2.8 both sound ok for aperture speed, I would recommend a google search for reviews on those specific lenses.
This information has been extremely valuable in selecting an upgraded camera. Based on the feedback you have provided, I’ve moved to the full-frame D3s and bought a 16-33 mm /f4 lens. I plan to be in Fairbanks in early March…hoping for the opportunity of a lifetime to see the lights. I want to be able to get a photo or two, Do you have suggestion of basic settings I should use…knowing that adjustments will be needed once out there. If the lights are really moving, I’m worried about a 50 sec exposure. Is there anything that can be done to bring down the exposure time? I have been told the D3s is one of the best low lights cameras and can use high ISO with minimal grain if used on a tripod. Please advise. Thanks so much for sharing your experience and knowledge so many others can enjoy and document the lights, too. You’re wonderful.
Sylvia,
Exposure times will vary based on ambient light levels and the intensity of the aurora. The only thing you can do to decrease the shutter time is increase your ISO. Experiment by doing some night photography before hand.
We are going on a cruise to Norway soon, the point of which is purely to see the Northern lights. The excursion will take us into the wilderness so we can get used total darkness and, hopefully, take some photographs.
The snag is I know little about photography. I have a Nikon Coolpix S2500. The ISO Sensitivity is 400, 800, 1600 and 3200. I will practice with the camera taking the moon and stuff before we go so I am familiar with the camera.
Thank you for your website and the useful tips.
Should I use ISO 3200? I could try a photo at 800 and work my way up and see how they turn out but I don’t think I will be able to fiddle about much at the temperatures we are likely to face.
Best wishes
Peter Ward
Peter, start at a lower ISO and work your way up, that’s all you can do in this case. Expensive cameras and expensive lenses give greater capability. Good luck.
Hi Patrick – I can only echo all the other comments about your great website and willingness to share your experiences with all of us would be northern light photographers!
I am going to Finnish Lapland at the beginning of March and keeping my fingers crossed for a sighting and hopefully some photos using your tips.
I have a Canon 7D with the 10-22 f/3.5 – 4.5 USM lens which I hope will be a suitable combination. However, one question I have is about battery life. Would you recommend using a battery grip with 2 batteries or just the camera and one battery. I will be taking spares but am not sure which is the best option. Any guidance will be appreciated.
Thanks. Alan
Alan,
While you may choose the vertical grip for other reasons, you don’t need it for aurora and batteries. If it is cold, you are better off keeping one battery in your warm pocket, and changing it out as needed. You camera/lens combo is o.k., but you will have long exposures with an f/3.5-4.5 aperture.
Hi.
Good info and I’m up to Norway / Sweden / Finland 16th Feb’ for a week.
I wanted to add that there’s some interesting info’ regarding the longer timed shots with Nikons re: Interval timer shooting (intervalometer) and also Time Lapse.
For the latter: “1.) Turn off every auto anything, including auto contrast and auto saturation. If you don’t, your sequences will flicker from the auto WB or auto sharpening or auto anything from frame-to-frame. ”
For the Nikon’s intervalometer and using multi shots over a long period, turn off the LCD review.!
“The D700 / D3 does more than a regular intervalometer & lets you shoot one shot at each interval, or a burst of them. The default interval is a minute and can be set from one second to many hours.
Thanks.
Tim
Tim, Some good points to consider for the Nikon shooters. I wish Canon had a built in intervalometer!
Hello Patrick, first let me start by thanking you for sharing your knowledge and experience, and of course your magnificent photographs.
I will be heading to Iceland later this month in hopes of photographing the northern lights. I have a Canon 7D and a 5D Mark II. My lenses include but are not limited to 8-15 Fisheye f/4 (which I suspect from what I’ve read on your blog is not the way to go); the EFS 10-22 (so 7D only); 16-35 f/2.8; 24-70 f/2.8; 50 f/1.4; 24-105 f/4; and the list goes on to include longer lenses that are not relevant to this topic. I also have 2 excellent tri-pods and ballheads, a wired trigger remote and a wireless trigger remote.
My question is as follows: should I bring both cameras and two tripods? My husband isn’t knowledgeable about photography, but if I got him set up, he certainly can press a shutter release. If you think 2 cameras aren’t necessary, which one would you take with you and why? The 7D is faster at 8 fps vs. 3.9 for the 5D, and I find the focusing mechanism to be faster and more precise on the 7D bc of the 19-point focusing system. Then again, if I am spot focusing, it may not matter. The 5D is full frame so I wouldn’t give up focal length from the 1.6 factor of the 7D. Pluses and minuses in both columns (which is why I have both cameras). Of course it would be easier to lug less gear, but I have all the proper carrying equipment, and we will be driven by a guide who is a local professional photographer in a large 4×4 vehicle. That said, if it were you, what equipment would you bring with you (we live in the US)?
Any advice you might be willing to share would be most appreciated. Thanks in advance, and happy shooting. 🙂
Debbie,
For aurora, I would use the 5D and the 16-35mm and possibly the 24-70. Running two cameras can be more complex than it seems, although possible. You may want the 7D for other photography, but the 5D wins easily for aurora.
Patrick, thanks so much for your prompt reply. I truly appreciate your advice. I love night photography and especially love long exposures. But, I am guessing this will be a whole new ball game, especially if it is windy (i.e. the shorter the exposure I can get away with the better). Thanks again.
Great write-up. I have a question about adjustments based on histograms. Am in Norway now – a cruise starting tomorrow and hope to get some good pix. You say to adjust setting based on the histogram? Can you provide some details? For example, do you want most of the pixels towards the middle (e.g., a bell shaped curve or uniform?), and if over or underexposed, adjust aperture and/or exposure time to get such a pattern.
Re: Histograms – there’s a Luminous link in the main body of the text which explains. In effect, you need ideally to keep all the digital “information” within the graph, remembering that white scenes typically need to be a tad over exposed and dark scenes need a tad under exposure as the camera is trying to make everything a happy 18% grey.
Set your camera to Matrix or an all-over exposure reading and not spot metering BTW!
As stated, make sure you understand the viewfinder as it appears very bright in isolation in the dark of night and will, in day light, have fooled you into believing the scene was correctly exposed (“it sure looked that way last night!”) – this is where the Histogram comes into its own at the time of exposure & thus confirms correct exposure.
Don,
Per Tim’s comments (thanks for fielding that one Tim). It is a complex subject but read through the article on luminous landscape. Generally, since at night there is a lot of black, you will find the histogram naturally reflecting that by being to the left (the far left is 100% black). But push some into the mid tones area and you will find that it looks better on your computer.
Thx Tim and Patrick. I had read over the article and it made a lot of sense. Just wanted to make sure there wasn’t more to it than making sure the pattern jives with the scene.
Just wondering why the recommendation to use a ballhead over a pan & tilt head here? I was going for the 324RC2 ball but a mate recommended the 804RC2 which does look to offer better control (and is £30 cheaper!)
James,
A ball head is:
More versatile, smaller, easier to pack, easier to operate in cold weather, use full for both landscape and wildlife photography. Basically more versatile overall.
Hey just wanted to thankyou for all the great advice…I rented the Canon EOS 5D MKII and the Canon 24mm IIL F/1.4 lens with a good Ball type tripod…through a company called Lenspro to go and they sent it to me overnight. I went out to the Chena Hot springs and went up the hill and got awesome photos! I was not sure I wanted to invest that amount of money with out trying it out first and the rental was a great option. Thank you for making it possible for an “amateur” to take some great photos…..there were probably 30 others that went up to get photos….but I was the only one prepared (even though I was up from Texas) all thanks to you. I recommended your site to everyone up on the mountain and to friends who see these photos.
… and I spent a small fortune (a beer is $15+, youth hostels $70+) taking in Tromso, nil points, and then travelling East into Sweden and Finland for 6 days and nights to get… zero. Back today 22/02/02 with very little to show for camping in minus 20 including a trip up Abisko Mtn. Nil points. Hugely deflated; and poor.
@tim who dif you use as a guide in tromso? Was weather bad? We are heading there tonight for 4 daysvso fingers crossed!
There are some specific web sites to check, one being Spaceweather, the Visit Tromso site and others. It’s snowed heavily these past few days, inc’ my last day and on my first day I walked up the mtn overlooking Tromso. No lights but clear. Then I drove East into Sweden, a mistake it seems. Have fun!
Patrick, firstly about the intervalometer on Canon cameras: There is a firmware upgrade called Magic Lantern for at least Canon EOS 550/600D, 60D, 5DmkII. It doesn’t replace the original firmware but it adds a few useful features ont top of it such as an intervalometer, some focus assist tools and bulb ramping for time lapse shooting in changing light conditions.
Secondly, thank you for the great guide. I am currently in Lapland myself and even though I consider myself pretty unexperienced in photography, I’ve already gotten a few fairly good pictures of the northern lights. This information helps a lot in getting it right.
-Mika
What Camera is BEST for these shots?
@patrick thanks very much for your advice. had a great trip to Tromso last week. first night, pretty faint exhibition. but our last night was fantastic. all of your recommendations were spot on. I rented the nikkor 17-35mm 2.8 specifically for this trip. what a joy to use at night–perfect for the lights. didn’t have to use more than 20 or 30 seconds exposure. here are some of the shots:
http://www.flickr.com/photos/kerrylondon/
Patrick! Thank you for your article! We are headed up to Lake of the Woods in northern Minnesota this weekend and I see that the northern lights forecast is good! I am excited to try to photograph them. It will be hopefully the first time in my life seeing them! Thank you for putting things in layman terms!
Thank you for a great tutorial! It’s the best out there in my opinion!
I have put a link to this article on my blog, and would like to make sure it’s OK with you :)Please let me know if you disapprove.
It’s been great help to me photographing the Northern Lights!
Thanks!
Lena,
No problem, go ahead and link. I’m glad you found it helpful.
Wow, I have been looking for information on how to photograph the aurora for awhile now, your site hits every point I wanted and answered every question in depth. I was born and raised in Fairbanks (Harding Lake), and have always wanted to dabble in Aurora photography, however I’m totally lost on where to start.
I have a 5D Mark II with a 16-35, which I was sure would do the trick, but this your article sure saves a lot of experimentation time since I now know where to somewhat start. We do a lot of travelling to extremely rural areas via bush plane and I’ve seen some incredible displays of northern lights on those trips.
Just wanted to say thanks for the info, I’ve book marked your site and will be sufficiently cyber stalking it I’m sure.
Thanks Angie,
I’m glad the article was of help. All the best.
Great Article Patrick & thakyou for all your helpful advice (best article on photographing Northern Lights)
Cheers,
Arthur
Best & most informative article on imaging the Aurora i have ever come across,thanks Patrick.
An informative and well written article Patrick. I will be in Fairbanks, ( coming from Australia) in September 2012. Downloaded the app onto my Iphone and Ipad so now I’m set. If you are on the street in Fairbanks and you see two granny types and they have an Aussie accent, please stop and say G’day.
Hi, i went last february to lapland with my nikons to make a time palse video.
your information in this web page was really usefull. Thank you very much
Hello,
Very useful information, thank you! My question is: you mention the need for an extra battery. I’m going wild camping for 5 days and I won’t have any opportunity to charge my battery. It usually lasts a good few weeks of every-day holiday shooting – can you guestimate how much batter will shooting in the bulb setting take up? Thank you! Agnieszka
Agnieszka,
I’m not sure how much battery consumption would happen under bulb. It depends on the type of battery, and the temperature. You could experiment at home…start with a full charge and do some test bulb exposures.
Hi Patrick,
Good call – I did a couple of tests at home and it doesn’t seem to have as big an impact as I thought. So, hopefully after charging the battery fully, it will be OK. Can’t wait! Thank you for the suggestion and brilliant tips on this website!
I have just purchased a Canon SX40 Bridge camera.
Will this be suitable for taking pictures of the Northern lights.
It looks like the SX40 has a fully manual mode so you’ve got a chance just set it up to the fastest aperture (probably 2.8 on a bridge) and hopefully it has a bulb or long 20-30s exposures. ISO is going to be the killer, the bridge sensors are pretty small often so you might not get much above the 400 mark.
Give it some tests before hand (in a field or even down your street trying to avoid light sources) and see what you can get.
Make sure the flash is turned off!
How often do you find yourself shooting exposures longer than 30 seconds? I’m trying to decide whether to get a basic remote shutter or an intervalometer where I can set it to as long as shutter I need.
My fastest lens right now is a 16-50 f/2.8 so I “think” I should be ok with the in-camera options which allows up to 30 seconds and BULB mode of course.
Shooting with Sony a700 and a77
Thanks!
Jaime,
It all depends on the strength of the aurora. Generally, with an f/2.8 lens you can be under 30 seconds. However, I often shoot longer exposures for star trail effect or other reasons. I have an intervolometer, but use the standard remote most often since it is easier to use in the dark.
The Canon SX40 will NOT shoot the Aurora! The previous model – the SX30 – would, but Canon put a new childproof governor on the SX40 which limits all time-exposure shots longer than 1.3 seconds to ISO 100. And all Canon point-and-shoot cameras are limited to a 15-second maximum exposure. They have no bulb setting.
I have been in a 9-month fight with Canon over this very issue since October 2011, because when I last went to Fairbanks in September 2011, I was actually able to shoot the Aurora with the smaller Canon SX130, and another brand equivalent of the SX30. There was no ISO limit on either of them (well, ISO 1600, which produced a lot of noise, but at least they did work for me.) When returned I purchased the SX40 in the hopes of repeating my Aurora shooting sometime next year, only to discover that Canon had – unannounced – put an ISO limit on the SX40!
The Canon SX40 will not take long-exposure night shots because of that arbitrary, imposed ISO limit, whereas the previous model, the SX30, would. I produced a video on it on YouTube, for those who are interested.
http://www.youtube.com/watch?v=ncILazaR18g
Best Wishes, SLOphoto1
thanks you so much for being so generous with your information. Do you conduct photo tours for the Auroras? Aslo, please put me on your mailing list. Thanks! Anne
Hello,
Thanks for so much and so good information. Maybe you can say something about a sort of dilemma. I can’t decide wich lens to buy for the northernlight photograpy. My choices are Zeiss 21 2.8 or Canon 24 1.4. I like the Canon because of the 1.4 but they say the 1.4 is pretty useless.So i thought if i must use the Canon at 2.8 to get good picture then i can maybe better buy the Zeiss that is 21 mm and perfect on 2.8. What is your opinion.
Regards from Holland
Jan,
If you have a camera that can shoot quality high ISO, I would go with the 21mm Zeiss for overall quality.
We are on holiday at Saariselka in Northern Finland and came here specifically in the hope of seeing the Aurora. My wife found your site which she made sure I studied properly (and did not skim read) and last night I tried to photograph the display for the first time. I have a Canon 20D and I used a fully open 17-85 f4-5.6 lens. I shot at ISO 400; f4; on a 30 second timed exposure. I only had a lightweight tripod which I used unextended, the roof of the hire care making an excellent and solid platform. I did not use RAW – the file size is as high as the camera will go other than RAW.
According to the Alaska Aurora site, activity level 2 only was expected but nonetheless the photos were really good. Level 3 is expected tonight and I am hoping for better – if the cloud stays away.
Very many thanks Patrick. I could not have done this without your help.
Tom
Good for you Tom!
Hi,
I am staying in Tromsø over January February 2013. A friend recommended this camera when I queried about something that could handle the Northern Lights.
http://www.dpreview.com/reviews/canong1x Canon Powershot GX1
What are your thoughts? I haven’t shot for a while and I have to remind myself of the lingo and techniques. This camera has an f 2.8 to 3.5. Is 3.5 better or the opposite way? It’s also got up to 12,000 ISO. Will that be helpful for aurora shooting?
I didn’t really want to spend too much money. What would your recommendation be and would it be wise to get insurance on the camera and gear?
Because I’m traveling all over Europe I need something lightweight and easily hidden from potential thieves.
I look forward to your feedback.
Jaci
Hi I also have a camera here already. An Olympus E-620. Would that be suitable for taking shots of the northern lights?
i I also have a camera here already. An Olympus E-620. Would that be suitable for taking shots of the northern lights?
Hi jaci, and others with specific camera questions.
I’m not familiar with that camera but you want the ability to use a cable release, high ISO, and preferably a fast aperture of f/2.8, which is also the equivalent of a 35mm or less.
Hi, I live in the Highlands of Scotland – the Isle of Skye. I have only ever seen the Northern Lights twice and then they appeared late last night. I ran in to get my Canon 650 but my photos just turned out to be horrid! I only photograph for fun but I was still annoyed! Having read your tips I am just so thankful for the information. I am confident that next time I try and photograph the beautiful skies your tips will help me bag a better shot. Thanks for sharing, I really appreciate it :0)
Thanks very much for this post. Photographing the Northern Lights is something that I never would have considered taking photos of. I always thought it would be something beyond my expertise. However, having read this article I now believe that it is not something beyond my capabilities.
I appreciate your detailed explanation of how to photograph the aurora using a digital camera. If I understand this article, you are using the term “digital camera” to refer to a true DSLR camera, and not the point-and-shoot (P&S) variety, such as my Sony HX100V.
I recently tried to capture the aurora using my Sony and had difficulty (as you might imagine). The P&S cameras do have settings similar to the DSLR’s, of course, but there must be limitations to what P&S camera sensors are able to pick up to be able to get the results you and your readers have. While I am able to capture the aurora with the 30-second exposure, the greens appear very blurry and the fainter greens appear as pixelated blotches in the final product. (I’m sure there are better photographic terms for this.)
I’m curious if any P&S owners have had success with photographing aurora, or is the only way to truly capture them is to sink money into a better (albeit more expensive) DSLR?
Duane,
There are so many point and shoot cameras that I can’t really address their ability to capture the aurora. I don’t use them, and the times I’ve tried to assist people who had them, the results were marginal. There may be however, one out there that can do the job. Perhaps another person who reviews this article can provide some insight for you.
Hi Patrick,
Thanks a lot for the detailed explanation of photographing the Northern Lights. My wife and I are going on a Northern Lights tour to Fairbanks, Alaska in two weeks and your blog was a great source of information.
Here is my question: I see that you have recommended the Nikon D800 as one of the better cameras to shoot the Northern Lights. I am considering buying it but the operating temperature for the camera is labeled as 0C – 40C, as per the Tech Specifications in the User Manual. However as I read the average temperatures at Fairbanks during our time of visit will be anywhere from the range of -10C to -20C, especially at night. So before I buy such an expensive camera, I want to make sure that it will withstand such extreme cold. If not do you use some special protection for the camera when shooting?
Any suggestions will be of immense help!
Warm regards,
Ananda
Ananda,
I would not be concerned about the temperature. All Canon and Nikons that I’m aware of, have never failed in the cold. I would add however, that in a recent evaluation last week of images taken with 800 and 1600 ISO on the Nikon D800, it did not compare with the clean files generated by the Canon 5D Mark III. The other Nikons may perform better at high ISO, but I was not overly impressed with the D8000 files, particularly in the shadows.
Hi Patrick: Thanks for all the wonderful information. I will be traveling to Chena Springs in March. My camera is a Canon 7D which I know is not the best for shooting the aurora, but I don’t have the $$ right now for a new camera. The lenses I have are 17-55mm 2.8, 50mm 1.8, and 10-22mm 3.5/4.5 I am thinking of renting a 14mm prime 2.8 lens for under $200 but don’t know if it will make that much of a difference. Would appreciate your advice. Thanks.
Diana,
The 14mm prime may offer some nice compositions, but you would probably be quite happy with the 17mm. Simplicity is worth a lot on a dark night, the zoom of the 17-55 would be handy and versatile, although I’m not familiar with the quality of that lens when shot at f/2.8. Check the reviews. The 10-22 would be best, and you can get some use out of itat 10mm, but it is on the slow side.
Hi.
Thought the UK visitors might like this.
http://aurorawatch.lancs.ac.uk/
YOu can set up email and SMS alerts and view recent images from Autunm (not Fall!) on the UK Google map for the NL’s in the UK.
@Diana; I wouldn’t say the 7D isn’t okay, at that level it’s more about the lens imho.
What I would say is the 50mm 1.8 is going to be no use on the crop sensor; you need something wider. The 17-55 is probably your best bet, and I’d venture you can get something on the 10-22 as well. I personally predominantly use a 30mm f1.4 sigma (60D).
Do you ever lead Aurora trips out of Fairbanks? I am looking at
taking 4 total, photographers up to Fairbanks in late March 2013
for a week of Northern lights.
Don Poggensee/ Wind Rider Images
174 Lakeview Drive
Ida Grove, Iowa 51445-8088
Images for Publications since 1979
Hi Don,
I don’t lead any trips out of Fairbanks currently.
Hi!,
Thanks for all the info. We are travelling to Norway on the 8th of November and will take a boat trip for 6 days Tomso-Kirkenes and back in search of the Aurora (A 5 and 4 Kp is forecasted for the 9th and 10th!) I have a Nikon D90 and only have a 18-55, a 55-200 and a 18-105 lens and a 1.4 converter. Which one would be most appropiate to use… i went to look for a 14-24 but they are priced at about 3 500 dollar here in South Africa!!!
Any pre-settings you would recommend on this Nikon for the Aurora? And thanks for the filter tip – I suppose it also refers to UV filters?
Thanks again – and wish us luck encountering the Aurora!
Regards,
Ina
Hi Ina,
I’m currently working on a book that covers this in depth. It might be available before your trip. If not, you can glean what I have written in the article here. Basically, you want the fastest, widest lens you can get. An f/2.8 or faster/larger opening.
What is the title of the book and when do you expect it to be published? I’m going to Alaska in March and I’d like to pre-order it if it’s expected to be available.
Diana,
If you sign up for my newsletter (on the home page of the blog in the right column) I will be sending a notification. It should be published this November as an E-book.
Hello. I will go to Iceland in december and I hope I will be able to take some good pictures of the Auroras. But I’m afraid I don’t have an adequate lens for it.
My equipment is Canon5D Mkii. 17-40 F4, 70-200 F2.8
As you said that a faster lens is desiderable I’m seriously considering a 50mm F1.8 (cheap and fast) but I don’t know if 50mm is good enough in a full frame. Another option is probably to hire a lens before going.
What do you suggest?
Thank you very much for your help and for a so complete site.
Regards
Jonathan
Hi Patrick,
I am travelling to Tormso, Norway, end of March 2013. It will be first time to shoot aurora. Can’t wait for that… Would you be so kind as to comment on Nikon D800 settings for aurora shooting.
One problem I had before – manual focusing in dark surroundings: If I manually focus to infinity, pics are usually not sharp simply because infinity mark covers interval of possible focusing positions(Nion 14-24 2.8).
Regards,
Sasa Popovic
If I may: Sasa. You need to experiment with setting before Tromso!
You will find that focusing in the dark at infinity is achieved by rotating the lens barrel all the way around “to infinity and beyond”, then back a bit.
You can see this clearly on the lens barrel on any day ‘cept a no-moonstate night, so make a note as to where the infinity focus really is on the guide on the lens barrel. This is in both M and ft. Plus the infinity sign.
Likely it’s bang in the middle of this figure of infinity symbol, which is a number 8 (lying on its back)-ish!
It’s worth doing some tests, even in the day light (!) as to how accurate this barrel guide is at say 15ft, 3ft etc. Very I’d say, but it’s the infinity focus you need to pay attention to for dark nights of little light with mtns on the horizon.
Tip: have a low powered (tiny) torch to hand so you can check settings yourself on the lens barrel at night should the need arise.
Tip: keep your best eye closed when using torches.
Tip: then close the eye piece shutter curtain. The button is to the L of the eye piece; 6pm is open, 8pm is closed.
Hi Patrick,
This is an incredible article and forum discussion (that I have to admit I’ve struggled to fully process as it gets closer to 2am).
I have been looking into getting a camera and lens set to capture the Northern Lights from Tromso in a month’s time and had no idea what I needed. The Canon 5d Mark III is more than twice the cost I was planning to spend and I was wondering whether you would have any suggestion for a more budget camera and lens combination that could do a good job (as compared to the great job for the Mark III)?
I was also planning to take both stills and video – is the latter too optimistic?
Cheers,
Martin
Hi Patrick, to follow up my previous query after a bit more investigation, I’d possibly be able to stretch to a 5D Mark II – in which case what lens would you recommend? Cheers, Martin
Thanks for the excellent article and for going “beyond the camera” in discussing shooting the Northern Lights. Shooting in such climes presents unique challenges and it’s good to see you are addressing those as well! Alaska is the only state I’ve yet to visit, so I’m looking forward to getting up there and putting your advice into practice some day!
Here are a couple of tips I’d like to add:
1. You mentioned insulating metal tripod legs. A good choice for this is the tubular pipe insulation available from any building supply store. These have a slit slong the side that even allows their use on tripods with central leg supports.
2. For cameras where battery and/or memory card access is retricted when mounted on a tripod, a tripod ring adapter can sometimes be fitted around the camera lens or lens mount for mounting the camera rather than using its sole plate tripod mount.
Martin,
The 5D2 or the 6D would both be fine. As for a lens, it depends what you intend to do. I like the 16-35 2.8 for its ultra wide range and versatility in both daytime and night time use.
Bruce,
Yes, those are both good suggestions. Although I recommend a ball head for the tripod that has a very easy to operate quick release capability.
Hi,
I’m off to see the northern lights in Norway on Saturday. I’m taking a Nikon D3100 with the standard 18-55mm VR Lens, and also a DX 35 mm f1.8 lens that I bought as an extra.
I am completely new to DSLRs, and I was wondering about the problem of taking night time shots (10 pm – 2 pm is the recommended time frame) from a cruise ship. Often I get an error message saying “Subject too dark” or that flash is required, or that the image is overexposed or underexposed (the exposure meter). Do you have any tips for dealing with these?
A funny problem with the DX 35 mm lens is that Live View does not seem to work. The LCD monitor just goes blank when I try to rotate the Lv dial to change to Live View.
Thanks a lot for any advice. Sandy
Sandy,
I’m writing on book on this topic now, as there is much to say. Basically, you want at least an f/2.8 lens in the DX range of 24mm. You cant shoot from a moving ship, a stable tripod is necessary on firm ground, set your camera to manual mode and try a 15-30 second exposure and adjust. Not sure what is happening with live view, that seems odd. I know canon gear best. I wish you luck.
Hello Patrick,
Thanks for mass helpful information here. I’ll have a trip to Alaska around end of JAN/2013, a wide lens now I have is Canon 10~20 f/3.5, it seems not enough to take better aurora photos, so I’m considering to buy a new one : 1. Tokina 11~16mm f/2.8(wider) and Sigma 29mm f/1.8(faster) , may I know your suggestion?
David from Taiwan
David, If you can only get one, I would go with the 11-16mm for its wide angle versatility. I think you will gain more in the ultra wide than you would with the speed.
Sorry for wrong type, Sigma lens is 20mm f/1.8
thanks a lot
Your site is very information. I had planned to go aurora shooting with a p&s camera. Now I realise that it is an uphill task so I intend to get a DSLR camera. As I have not used one before I have to learn quickly within 2 months.
Will you recommend Canon EOS650C with S18-55mm (f3.5) lens or Nikon D5200 with 18-55mm (f3.5) lens?
I realise from the comment postings that the aperture must be 2.8 or lower, however the lens in this category are beyond my budget. Any recommendations for lens compatible with the Canon/Nikon that is less than $500 and able to capture the aurora?
Hi Amanda, sorry for a delayed response. I’ve been traveling. You might try the Tokina 11-16mm f/2.8, it runs just a bit over $500 but is your only really good ultra wide option with that camera system.
Hallo,
Thank you for all the info.
I’m happy with it and feel better prepaired for my pfoto
shoot of the aurora next february in Lapland Sweden.
At home I tried all the settings on my eos 7d to become familiar to do all these things in the dark to shoot the aurora.
I found out that I can use the Canon RC-1 wireless remote
for all the settings, also bulb mode longer than 30 sec.
So for them who has one, you need not to buy an other release.
Except perhaps for the sec. counter on your camera.
Greetings from Noud.
Hi Patrick
I am just wondering if you have looked at Canon 6D? It seems like it is much sensitive, and it has very low noise even compared with 5D Mark III. I am just thinking to either get that camera or replace my Canon 17-40mm F4 with the 15-35mm F2.8. What would you recommend?
Thank you
Hi Rodrigo,
I have not tested the Canon 6D so I can’t comment on that. If you are wanting to shoot aurora, I strongly suggesting going with that 16-35 f/2.8 as opposed to the f/4.
Hi Patrick,
I was wondering if you could provide/add an example of a histogram to your tutorial. I have read the article on http://www.luminous-landscape.com but an example of an actual histogram would help understand it even more. Thank you for sharing your experience with us. Cheers, Andy
Great article Patrick – really thorough. Tried to make a contribution by PayPal but I didn’t have your email address. Will do when you let me know. The PayPal donate button just took me to my PayPal account.
I am off on an Aurora shoot in northern Norway for first two weeks of Feb. I’ll have a 5D MKIII with Canon 24mm f1.4 and Nikon 14-24 f2.8. I have several other lenses but these are probably the key ones I’ll use for the aurora. I’ll shoot everything raw including time-lapse which I will do on a motion control slider. I’ll also shoot video.
Main questions are whether to use a ballhead such as Manfrotto MH054M0-Q5 or maybe a Manfrotto Junior Geared Head. I currently have a video fluid head MVH502AH which is a bit overkill and bulky. I am concerned that a ballhead might be tricky to operate with the weight of a long lens so the geared one might be a better option. Any advice on that?
Also with noise reduction. I understand that when shooting raw I can just ignore the High ISO Speed reduction which set on in camera as default. And I should set long exposure NR to on?
What do you reckon is the highest ISO I should shoot at to keep grain under control and potentially be able to blow up timelapse to 4K video?
All the best
Phil
Phil,
Ballheads are easy to use with smaller lenses, no geared option is necessary. As for Noise reduction, you can turn off both High ISO (which is for jpeg only) and Long exposure noise reduction is not needed with the canon 5d Mark III according to my tests. Good luck
Oh, and what do you reckon to Black Magic’s Magic Lantern firmware for the 5D? – I’ve heard great things about it but they don’t have a tried and trusted release for the MKIII yet – seems like it might still be a bit of a risk. But some real benefits.
Phil,
I have not used the magic lantern firmware so I can’t comment on it. I’ll be checking into it to see if there is any merit for aurora shooting
Thanks Patrick
I use a Canon 70-200mm f2.8 lens quite a bit – could be tricky on a ballhead? Mind you they seem to be able to take more weight than the geared ones but might be hard to use with a heavy lens?
Phil,
I use ballheads exclusively. From wide angle to 500mm, they are excellent. I presume you have a tripod collar mount for your 70-200?
Thank you.
I do have collar mount for that lens – you find that you can adjust the camera without it being top heavy and difficult to adjust with a long lens? What ballhead do you use? I’ve been looking at the Manfrotto Q5 054.
Phil,
I use the Kirk BH-3 for aurora.
http://www.kirkphoto.com/BH-3_Ball_Head.html
Thanks
Phil
Patrick,
Thank you for the tips. Upon my return home from my deployment I have accomplished getting some great shots of the northern lights. I am now seeking better areas to photograph them in to get better foregrounds in the scenes as well. As I haven’t had the opportunity to travel around as much as I would like I am hoping to get out and about more. I hope your travels have proven to be very photogenic for you.
Mike
Thanks Mike, glad it was a successful venture.
Patrick: Can you enlighten me about the 1000 to 100 guideline for photographing stars? I’m told that to get sharp photos of stars one should use a shutter speed in seconds that is no longer than the focal length you’re using divided into 100 if you’re at the equator or 1000 if you’re at the pole. Do you use this guideline and can you tell me what number I should use to divide my focal length into at Chena Springs?
Diana,
I’m not familiar with that equation, however, if true, it sounds like there is a corrective calculation based on latitude. I shoot almost exclusively from 64-68 degrees north, under the auroral belt. At that location, isolating the stars (the meaning of that varies among individuals) is usually around 15 seconds for a 16-20 mm lens. The good news is, it is easy to test. Take a shot and zoom in on the stars until you find an acceptable star-trail free shutter speed. You can even test this before there is any aurora action. Once you know the time for one lens, you can extrapolate that to you other lenses as well. Good luck.
Hello, first i want to say good job on the guide! But if possible, could someone help me find a camera capable of takeing a picture of the northern lights?(i would use the camera for landscape photos, and whn the lights are out would take pictures of them) The trouble is i am looking for a more lightweight camera, that isnt as heavy as a more professional camera(the ones with the changeable lenses)I am looking for something with a body type not much larger than this.(http://www.photographyblog.com/reviews/canon_powershot_sx50_hs_review/specifications/)
I found one camera, that has everything i need, except im not sure if it is capable of photographing the northern lights.
(http://www.getolympus.com/us/en/digitalcameras/tough-tg-1.html)
The main thing i would like to know is if there are any cameras that you would reccomend that you may have used before. I cant go more than $500 and would really like to keep it under $400. If you could help me that would be amazing.
I am going to be shooting the lights in 3 days and unsure what are my best options for lenses. I will be using Canon 7D, I own Canon 10-22mm and 17-55mm, but I am considering renting the Canon 14mm 2.8L II or the 16-35mm.
Beth, I would strongly recommend getting a wider lens in the f/2.8 category. The 14mm would be slightly wider, the 16-35 would give you more versatility.
Thanks for all the help. I am heading to Coldfoot in late March. Do you think getting dedicated winter shoes are needed for that time? Additionally, is there a lot higher probability of catching the aurora at Coldfoot compared to Fairbanks?
Rahul,
You want a good winter boots with thick sidewalls and sole depth, that provides sufficient insulation. It can get very cold in March.
Great article! We followed your advice and got AMAZING photos on Feb. 10 in Yellowknife. Used a Canon Rebel TXi and Canon Super Wide Angle EF 20mm f/2.8 USM. We shot in Manual mode at 1600 and 800 ISO with exposures between 20 and 30 seconds. Seemed like no matter what we did, we couldn’t get a bad shot.
Kim, glad to hear the successful report.
Thank you so much for all this information. It’s been so important in preparing myself for the journey I’m about to go on. Both myself and my partner are going to Northern Finland and Norway in three weeks time.
We’re going out with the Aurora Hunters who, like you, train people to take photographs of the Northern Lights. Then we’re going on an eight day husky trip. We’re soooooo excited. A trip of a life time.
We’re doing a blog as we go and uploading photos and a diary: http://www.astrocal.co.uk/blog
Again, I want to thank you.
Hi, is the book likely to be available on amazon kindle?
I LOVE THE BOOK! I downloaded it on my iPad and read it in one night. Am taking it with me next week to Alaska where I am sure I will refer to it time and time again. Thank you Patrick. My only suggestion for future editions would be to make it easier to navigate.
I am heading to Iceland in a week with my D600. I’m looking into what shutter release to bring with me and trying to figure out if there is a recommendation of wireless vs. wired.
Given it might be cold (sub-30 degrees), I wonder if the wireless remote is a mistake given battery life? The wired remote should be OK for that, but has the disadvantage of being connected to the camera which could introduce camera shake.
Would love a recommendation!
TC,
I’ve discussed this in my eBook, with further comments on the subject. I would only use wireless if I needed to, that it, wanting to trigger the shutter from far away. Simple is best.
Wanting to photograph the northern lights with a Canon S5 IS, driven manually – will this work.
Cheers
Ian, I’m not familiar with that camera. In my eBook I discuss what to look for in a digital camera if you want to shoot the aurora. You can check that against the what the camera offers.
Thank you so much for this info – It’s always been a dream of mine to photograph the northern lights but I’ve always wondered how you would do that – are they really that bright??
I’ve read some good stuff here. Definitely value bookmarking for revisiting. I surprise how much attempt you place to make this type of magnificent informative web site.
I visited many blogs but the audio feature for audio songs present at this web page is
really wonderful.
Thanks for all the good tips Patrick, I’ll for sure check our your e-book.
Do you have a preference between the
Canon EF 16-35mm f/2.8L II USM Ultra Wide Angle Zoom Lens or Canon EF 16-35mm f/2.8L USM Ultra Wide Angle Zoom Lens for a Canon 60D SLR Camera for shooting the Auroa?
At around $1600 price point do you recommend going with the Canon brand?
Lifestyle factors can produce strong effect on breathing and
tissue oxygenation. You may have a problem reading any kind of print in smaller fonts, too.
The act is therefore unifying as it is there for all survivors.
Hi Patrick – I am going (1st time) to Iceland week of Thanksgiving to photograph Northern Lights.
Hope for 11 year cycle peak!
Still FILM – 120 medium format – • Mamiya AFD645 – will take off ALL filters, focus to infinity – Lens:
80mm -f2.8 – 50mm (35 equivalent (8:5 ratio))
55mm – f2.8 – 35mm (35 equivalent (8:5 ratio))
35mm – f3.5 – 21.5mm (35 equivalent (8:5 ratio))
2.8 – 25 seconds – 80mm and 55mm lens 20/25/30 (Bracket)
3.5 – 35 seconds – 35mm lens – 30/35/40 (Bracket)
using BULB Setting, lowest f-stop setting
Tripod, trigger cable
Any suggestions GREATLY APPRECIATED! Will be out many nights/all night! 🙂
Many Thanks, Chris
Chris,
I would bracket by a greater amount than 5 seconds, since that is only 1/3-1/5 of a stop. It all depends on ambient light and the intensity of the aurora. Some of those judgments require experience. Just shoot a lot to cover your base. Such is the world of film. If you have not already read my ebook, I think you will find it well worth the money. And finally, If you can splurge, rent a canon 5D MarkIII and a zeiss 21mm f/2.8 just for fun, and take a few shots. You will be instantly converted. Good luck, let me know how it goes.
Hi being new at this photography which I find very frustrating and also very rewarding .will be going to Iceland this November the only lens I have is a Sony 16-50mm f/2.8 would this be suitable or should I invest in a sigma 10-20mm f/3.5 or a tokina 11-16mm to photograph the northern lights……thank you
Hi Gary,
I discuss the reason’s surrounding lens choice in depth in my eBook. If you are traveling all the way to Iceland, I highly recommend the book as it will give you a lot to consider regarding the aurora. Your 16-50 should do o.k. as it is an f/2.8. A wider f/2.8 would be helpful, but not essential.
Very helpful tips for me. I have been three times to different places (Norway & Sweeden) saw a lot but could not get a decent photo. I will try this Time in Finland ( 3,4,%th October ’13) & I hope following your tips i will be able to record some photos. Thanks.
Hi , I’m about to go to Iceland and am still learning how to use my Nikon D3100. I’m on a budget and can’t really afford to by a wide angle Lens. I do have 18-55mm VR Lens the Lowest it goes F/3.5 is that any good? and how can I use it to the best advantage as I would Like to get some Good/ reasonable pics.
Hi Patrick
My apologies as I am extremely new to photography in general. I will be going to see the northern lights in Finland in 2 weeks. I want to take the best photos possible while on a limited budget. One department store recommended the Sony NEW-3N while another recommended the Samsung NX1000 (which I like because it seems more user friendly and I like its features such as the wireless uploading of photos). Which would you recommend? Your help would really be appreciated.
Cheers , Dana
Dana,
I’m not familiar with either of those cameras, Sorry about that, there are so many out there. In my Ebook I discuss the things to look for in a digital camera. You might want to reference that an see if these camera’s have the necessary settings.
Thanks for the really useful info. I’m headed to Swedish Lapland in December and, from your article, it looks like my Sigma SD14 isn’t going to cut it — would that be a fair assessment? Should I look to borrow a camera from someone?
Hi patrick
I am going to fairbank in nov. I have canon t5i and pancake 40mm f2.8 and kut 18-55 f3.5 stm. Thinking about buying 28mm f1.8. Which of these lens do u think is best for shooting northern light. Thanks
I think what you’re doing here is pretty good. But there is a few problems with your argument and I think you should probably rethink it.
This is an excellent insight into shooting such am amazing phenomenon !!
Fantastic resource and great images, the book sounds great – do you also do workshops?
Thanks Ben,
Yes, see the Tours link in the top navigation bar.
Great, I’ll take a (more careful) look. Thanks
excellent guidance for new photographer its really useful
I also set WB to sunny rather than auto.
This book is fantastic. I purchased it 1 month before my trip Svalbard and it was a holiday saver. I used every bit of advice Patrick put in and ended up capturing some amazing sequences of dancing lights.
The most important advice was on how to preset your camera and lens – I was out of the van and taking photos from the tripod in less than 2 minutes at one stop.
Very good advises and recommendations for Northern Lights Photography. Thanks so much
Thank you for the thorough write up. Very helpful!
excellent, thanks – giving it a whirl tonight!
They say we might be able to see it tonight in NY State – Thanks for the tips on how to get the best photos.
Thanks for the great tips! I hope to see the lights near Tacoma/Seattle tonight. Hopefully, one day, I’ll make it up to Alaska 🙂
Thanks! They are saying we’ve got a chance as far south as Minneapolis/St. Paul tonight.
Found this as I’m about to go out in the Columbia River Gorge to hunt for it! Thanks for the tips!
Thank you so much for your tips! Going Aurora hunting tonight, will be using your tips!
Thank you for all the great tips! Off to Iceland next week!
Heading to Iceland in a couple months to look for the Lights!
Thanks! Heading to Iceland in two days!
Off to northern Finland next week. Good tip about removing the UV lens that I use for protection. Still in early days with a Nikon D750 after using Sony for several years but always shoot in RAW. I hope to get clear skies!
I have a Panasonic Lumix DMC-FZ70. Is this good for photographing the aurora?
I’m not familiar with that camera-without doing some research. If it has at least an f/2.8, and performs ok at 800-1600 iso, it should work.
what would be a good camera to get for a beginner?
I would recommend my eBook, since I go over the types of cameras and options extensively there. There a wide variety of considerations, so exploring that more thoroughly would be of benefit.
thank you I will do that
Hi, Thanks for sharing these amazing tips on Digital
Camera.
Thanks for all those precious tips ! Hope we’ll be lucky in Norway (Lofoten & Tromso, september…)
Hello there! I am planning to download the full book as PDF – will I also get instructions on how to download it onto my mobile phone – Android?
Sarah, you can google how to transfer the file to your iPhone. It is readable there no problem.